해당 글은 MacOS M1 기반으로 MySQL, Workbench 설치하는 과정을 간략하게 작성했습니다.
MySQL
[1] brew를 통해 mysql 설치
brew install mysql
➜  ~ brew install mysql
==> Downloading https://formulae.brew.sh/api/formula.jws.json
#=#=#
==> Downloading https://formulae.brew.sh/api/cask.jws.json
#=#=#
==> Fetching dependencies for mysql: icu4c, ca-certificates, openssl@1.1, libevent, libcbor, libfido2, lz4, protobuf@21, zlib, xz and zstd
==> Fetching icu4c
==> Downloading https://ghcr.io/v2/homebrew/core/icu4c/manifests/72.1
######################################################################### 100.0%

// ... 중간 생략
==> Downloading https://ghcr.io/v2/homebrew/core/zstd/blobs/sha256:e3cb579108afe
==> Downloading from https://pkg-containers.githubusercontent.com/ghcr1/blobs/sh
######################################################################### 100.0%
==> Fetching mysql
==> Downloading https://ghcr.io/v2/homebrew/core/mysql/manifests/8.0.33_1
######################################################################### 100.0%
==> Downloading https://ghcr.io/v2/homebrew/core/mysql/blobs/sha256:e56237aaf649
==> Downloading from https://pkg-containers.githubusercontent.com/ghcr1/blobs/sh
######################################################################### 100.0%
==> Installing dependencies for mysql: icu4c, ca-certificates, openssl@1.1, libevent, libcbor, libfido2, lz4, protobuf@21, zlib, xz and zstd
==> Installing mysql dependency: icu4c
==> Pouring icu4c--72.1.arm64_monterey.bottle.tar.gz
🍺  /opt/homebrew/Cellar/icu4c/72.1: 263 files, 78.4MB
==> Installing mysql dependency: ca-certificates
==> Pouring ca-certificates--2023-05-30.arm64_monterey.bottle.tar.gz
==> Regenerating CA certificate bundle from keychain, this may take a while...
🍺  /opt/homebrew/Cellar/ca-certificates/2023-05-30: 3 files, 216.2KB
==> Installing mysql dependency: openssl@1.1
==> Pouring openssl@1.1--1.1.1u.arm64_monterey.bottle.tar.gz
// ... 중간 생략
🍺  /opt/homebrew/Cellar/zstd/1.5.5: 31 files, 2.3MB
==> Installing mysql
==> Pouring mysql--8.0.33_1.arm64_monterey.bottle.tar.gz
==> /opt/homebrew/Cellar/mysql/8.0.33_1/bin/mysqld --initialize-insecure --user=
==> Caveats
We've installed your MySQL database without a root password. To secure it run:
    mysql_secure_installation

MySQL is configured to only allow connections from localhost by default

To connect run:
    mysql -u root

To start mysql now and restart at login:
  brew services start mysql
Or, if you don't want/need a background service you can just run:
  /opt/homebrew/opt/mysql/bin/mysqld_safe --datadir=/opt/homebrew/var/mysql
==> Summary
🍺  /opt/homebrew/Cellar/mysql/8.0.33_1: 318 files, 300.0MB
==> Running `brew cleanup mysql`...
Disable this behaviour by setting HOMEBREW_NO_INSTALL_CLEANUP.
Hide these hints with HOMEBREW_NO_ENV_HINTS (see `man brew`).
==> Upgrading 1 dependent of upgraded formulae:
Disable this behaviour by setting HOMEBREW_NO_INSTALLED_DEPENDENTS_CHECK.
Hide these hints with HOMEBREW_NO_ENV_HINTS (see `man brew`).
openssl@3 3.1.0 -> 3.1.1
==> Fetching openssl@3
==> Downloading https://ghcr.io/v2/homebrew/core/openssl/3/manifests/3.1.1
######################################################################### 100.0%
==> Downloading https://ghcr.io/v2/homebrew/core/openssl/3/blobs/sha256:e2a9c60c
==> Downloading from https://pkg-containers.githubusercontent.com/ghcr1/blobs/sh
######################################################################### 100.0%
==> Upgrading openssl@3
  3.1.0 -> 3.1.1

==> Pouring openssl@3--3.1.1.arm64_monterey.bottle.tar.gz
🍺  /opt/homebrew/Cellar/openssl@3/3.1.1: 6,495 files, 28.4MB
==> Running `brew cleanup openssl@3`...
Removing: /opt/homebrew/Cellar/openssl@3/3.1.0... (6,494 files, 28.4MB)
Removing: /Users/junyongmoon/Library/Caches/Homebrew/openssl@3--3.1.0... (7.6MB)
==> Checking for dependents of upgraded formulae...
==> No broken dependents found!
==> Caveats
==> mysql
We've installed your MySQL database without a root password. To secure it run:
    mysql_secure_installation

MySQL is configured to only allow connections from localhost by default

To connect run:
    mysql -u root

To start mysql now and restart at login:
  brew services start mysql
Or, if you don't want/need a background service you can just run:
  /opt/homebrew/opt/mysql/bin/mysqld_safe --datadir=/opt/homebrew/var/mysql
[2] mysql 버전 확인
mysql --version
➜  ~ mysql --version
mysql  Ver 8.0.33 for macos12.6 on arm64 (Homebrew)
[3] mysql server 실행
- MySQL 서버를 가동시켜주는 명령어
mysql.server start
➜  ~ mysql.server start
Starting MySQL
. SUCCESS!
[4] mysql 기본 설정
mysql_secure_installation
질문 리스트
- VALIDATE PASSWORD COMPONENT ( 복잡한 비밀번호 여부 ) : n
- set the password (비밀번호 설정 & 확인) : 1234
- Remove anonymous users? (익명 사용자 삭제) : y
- Disallow root login remotely? (원격 접속 허용하지 않을 것인지) : y
- Remove test database and access to it? (test DB 삭제 여부) : n
- Reload privilege tables now? (변경된 권한을 반영하여 테이블 다시 로드) : y
➜  ~ mysql_secure_installation

Securing the MySQL server deployment.

Connecting to MySQL using a blank password.

VALIDATE PASSWORD COMPONENT can be used to test passwords
and improve security. It checks the strength of password
and allows the users to set only those passwords which are
secure enough. Would you like to setup VALIDATE PASSWORD component?

Press y|Y for Yes, any other key for No: n
Please set the password for root here.

New password:

Re-enter new password:
By default, a MySQL installation has an anonymous user,
allowing anyone to log into MySQL without having to have
a user account created for them. This is intended only for
testing, and to make the installation go a bit smoother.
You should remove them before moving into a production
environment.

Remove anonymous users? (Press y|Y for Yes, any other key for No) : y
Success.


Normally, root should only be allowed to connect from
'localhost'. This ensures that someone cannot guess at
the root password from the network.

Disallow root login remotely? (Press y|Y for Yes, any other key for No) : y
Success.

By default, MySQL comes with a database named 'test' that
anyone can access. This is also intended only for testing,
and should be removed before moving into a production
environment.


Remove test database and access to it? (Press y|Y for Yes, any other key for No) : n

 ... skipping.
Reloading the privilege tables will ensure that all changes
made so far will take effect immediately.

Reload privilege tables now? (Press y|Y for Yes, any other key for No) : y
Success.

All done!
- 마지막에 All done! 이 뜨면 설정 완료
[5] mysql 접속
mysql -u root -p
- root 계정에 password 사용해서 접속한다. (password: 1234라고 위에서 가정했다)
➜  bin git:(stable) mysql -u root -p
Enter password:
Welcome to the MySQL monitor.  Commands end with ; or \g.
Your MySQL connection id is 17
Server version: 8.0.33 Homebrew

Copyright (c) 2000, 2023, Oracle and/or its affiliates.

Oracle is a registered trademark of Oracle Corporation and/or its
affiliates. Other names may be trademarks of their respective
owners.

Type 'help;' or '\h' for help. Type '\c' to clear the current input statement.
- 만약 아래와 같은 오류가 발생할 수 있다.
➜  ~ mysql -u root -p
Enter password:
ERROR 2002 (HY000): Can't connect to local MySQL server through socket '/tmp/mysql.sock' (2)
- 이런 경우 MySQL 명령어를 터미널에서 쓰기 위해서는 start MySQL 하는 과정이 필요하다.
brew services start mysql
mysql -u root - p
- 위의 명령어를 쓰면 에러 처리가 되면서 성공이 된다.
[6] mysql 상태 확인
status
mysql> status
--------------
mysql  Ver 8.0.33 for macos12.6 on arm64 (Homebrew)

Connection id:		17
Current database:
Current user:		root@localhost
SSL:			Not in use
Current pager:		less
Using outfile:		''
Using delimiter:	;
Server version:		8.0.33 Homebrew
Protocol version:	10
Connection:		Localhost via UNIX socket
Server characterset:	utf8mb4
Db     characterset:	utf8mb4
Client characterset:	utf8mb4
Conn.  characterset:	utf8mb4
UNIX socket:		/tmp/mysql.sock
Binary data as:		Hexadecimal
Uptime:			23 min 47 sec

Threads: 4  Questions: 318  Slow queries: 0  Opens: 257  Flush tables: 3  Open tables: 175  Queries per second avg: 0.222
[7] mysql 종료
exit;
mysql> exit;
Bye
[8] mysql server 종료
- MySQL 서버를 종료시키는 명령어
mysql.server stop
➜  bin git:(stable) mysql.server stop
Shutting down MySQL
... SUCCESS!
Workbench 설치
-
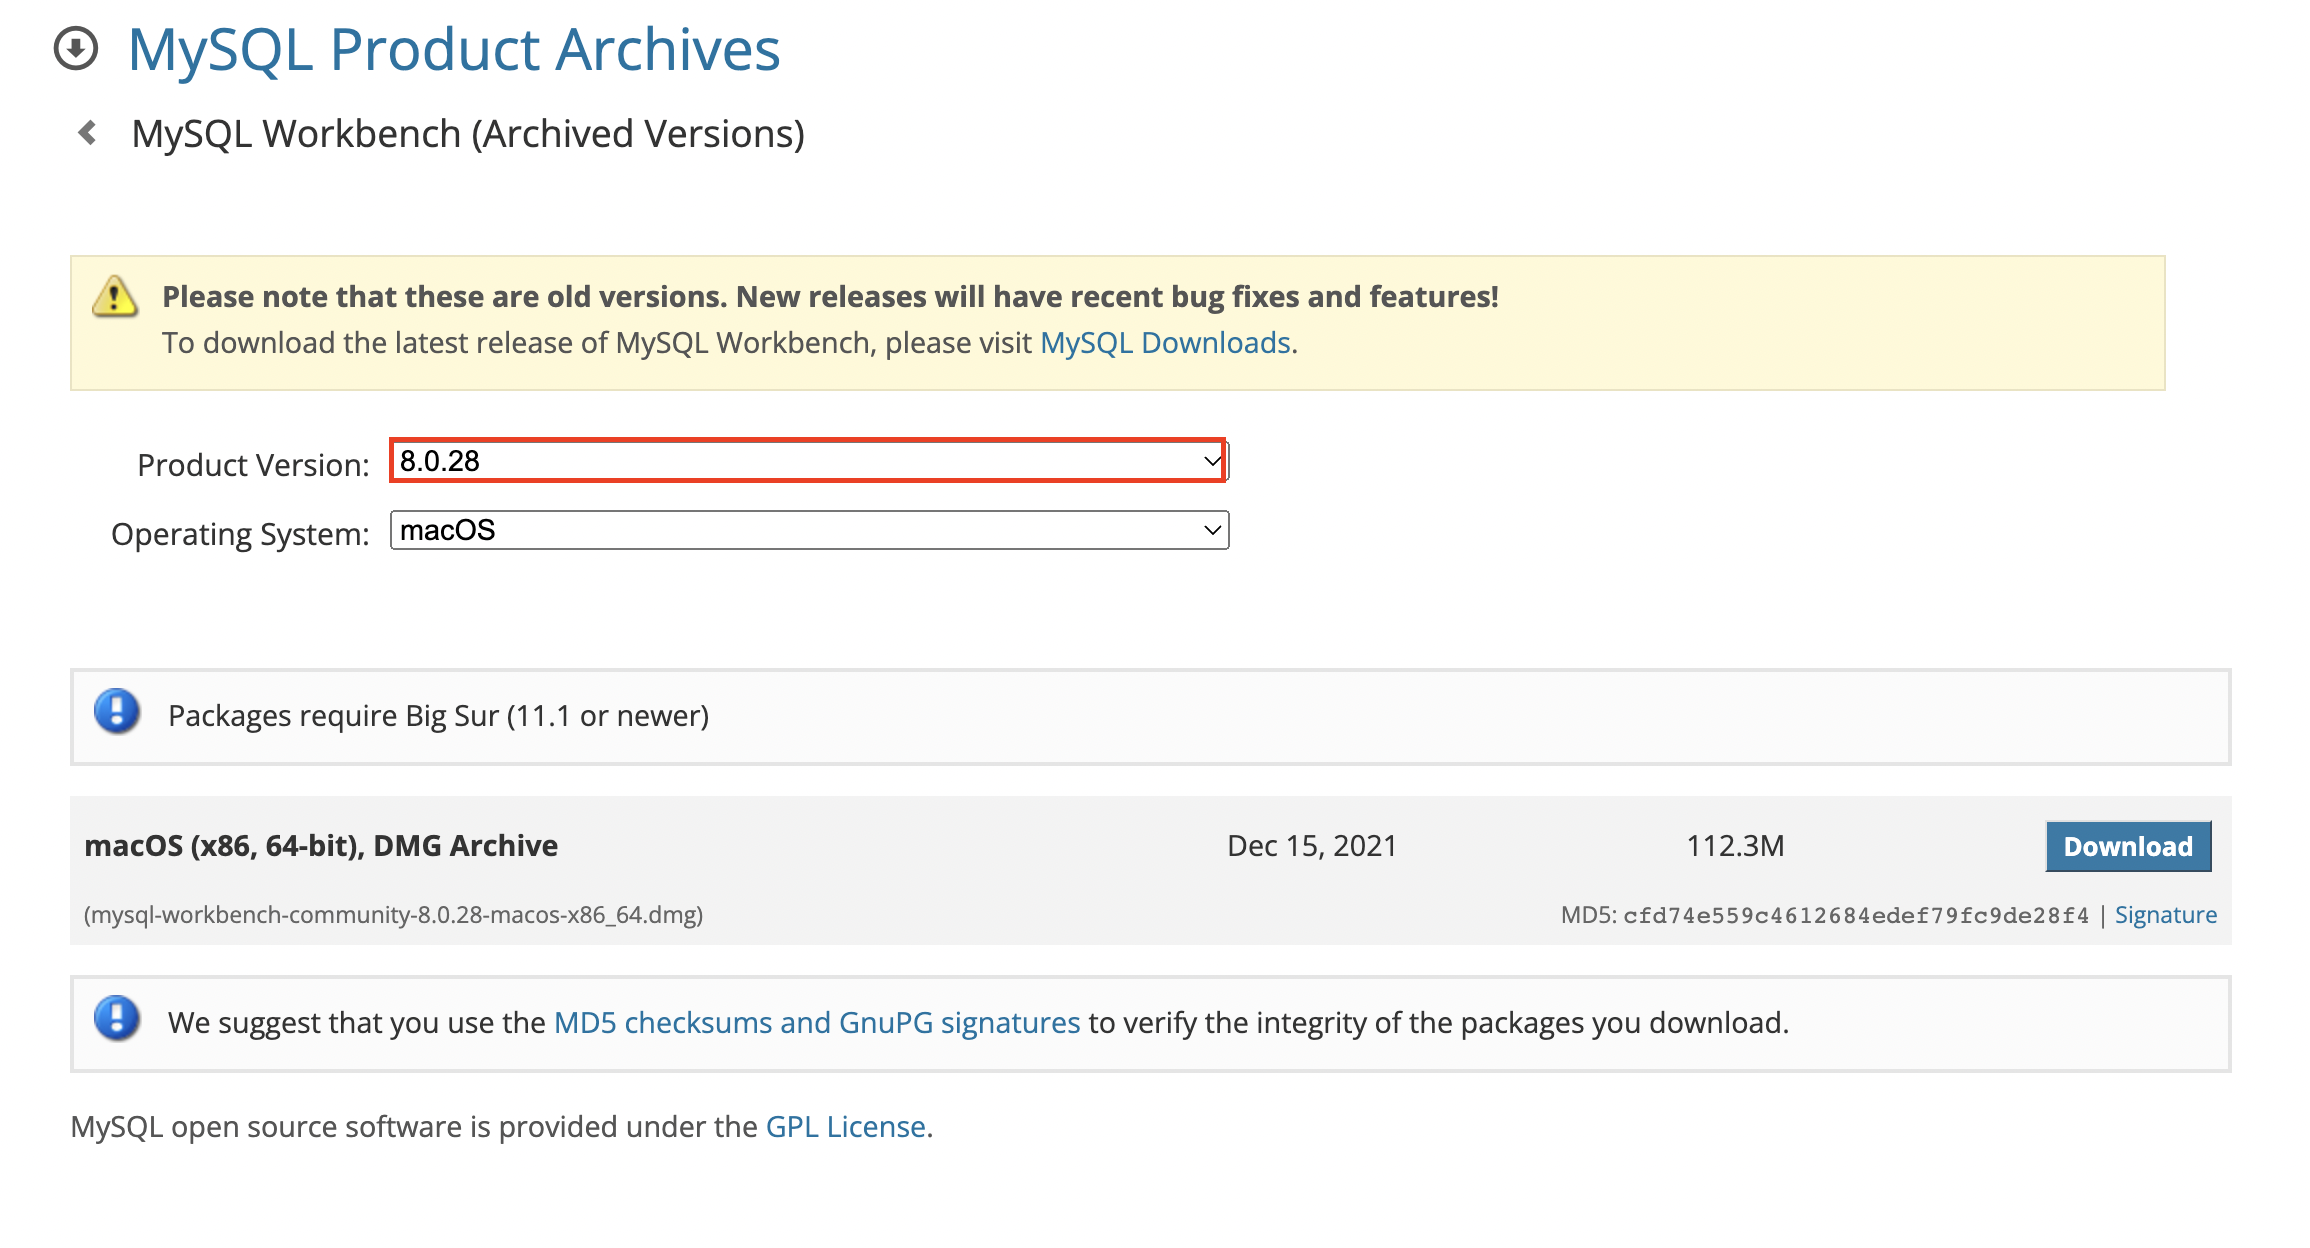
해당 다운로드 링크를 클릭한다.
-
설치할 버전과 OS를 확인하여 다운로드 한다.
-
Mac M1은 반드시 Product Version을 8.0.28로 해야 mysql과 호환이 가능하다.
(8.0.32 이상으로 하면 나중에 mysql 실행할 때MySQLWorkbench 응용 프로그램이 예기치 않게 종료되었습니다라는 문구가 뜨게 된다)
-
다운로드가 완료되었다면,
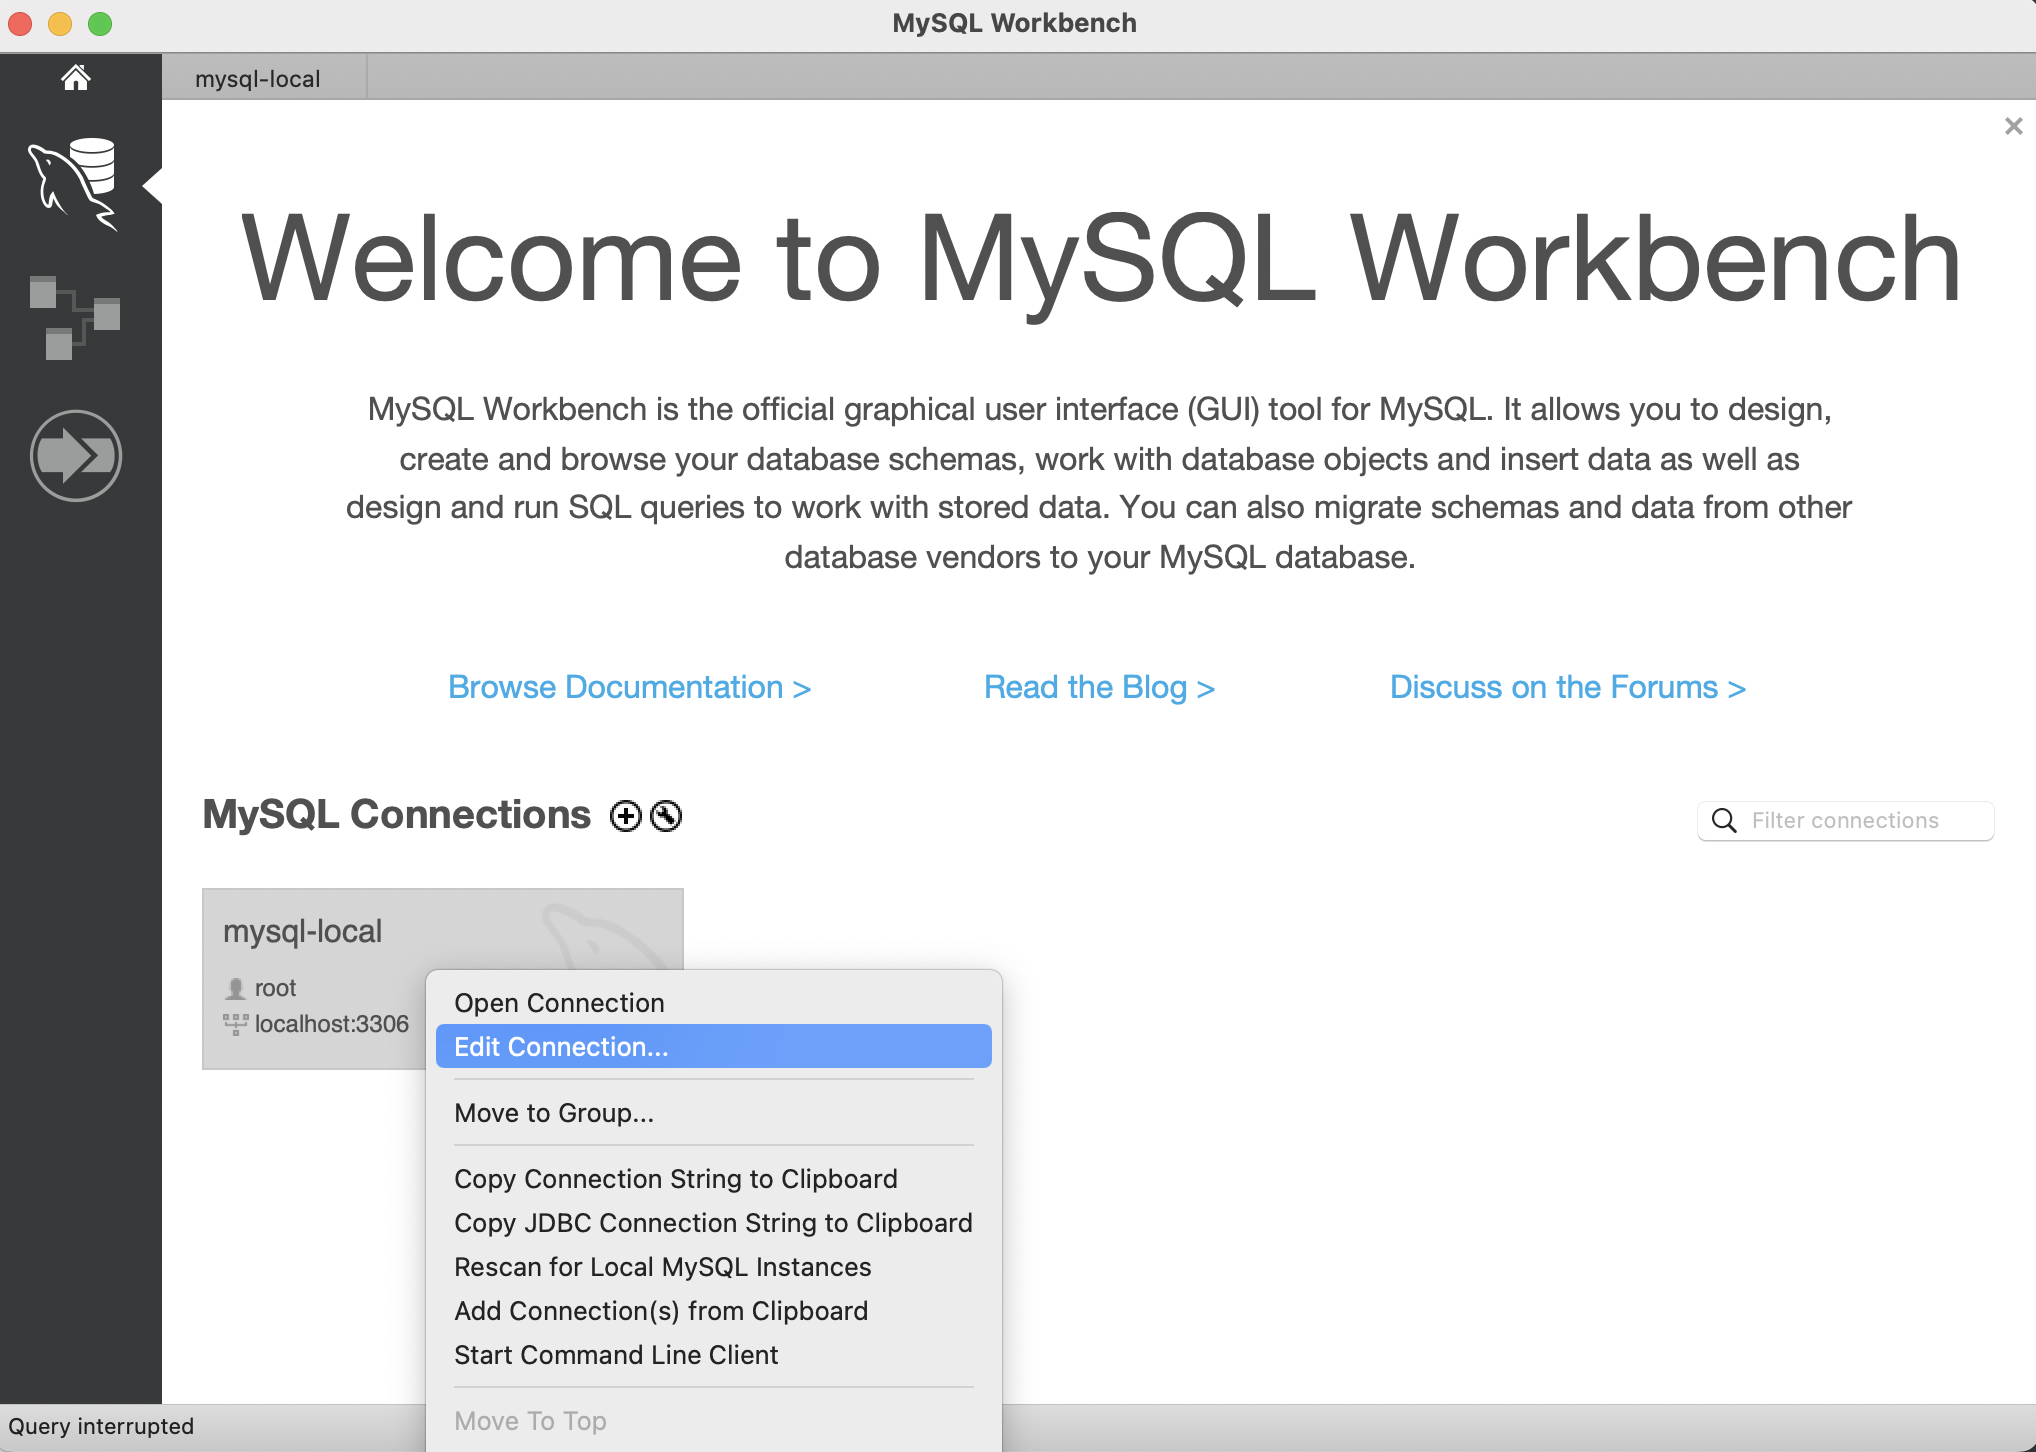
commend + space(검색창 여는 단축키) 로 MySQL Workbench 앱을 실행시킨다. -
MySQL Connections 밑에 있는
mysql-local에서 마우스 오른쪽 버튼 - Edit Connection 클릭한다.(참고로,
mysql-local부분은 내가 임시로 입력한 Connection name 이다)
-
원하는 Connection name(
mysql-local)을 입력한다. -
로컬에서 실행 중인 MySQL Server를 사용하는 경우 아래와 같이 설정한다.
-
hostname: 127.0.0.1 또는 localhost
-
mysql 기본 포트: 3306
-
-
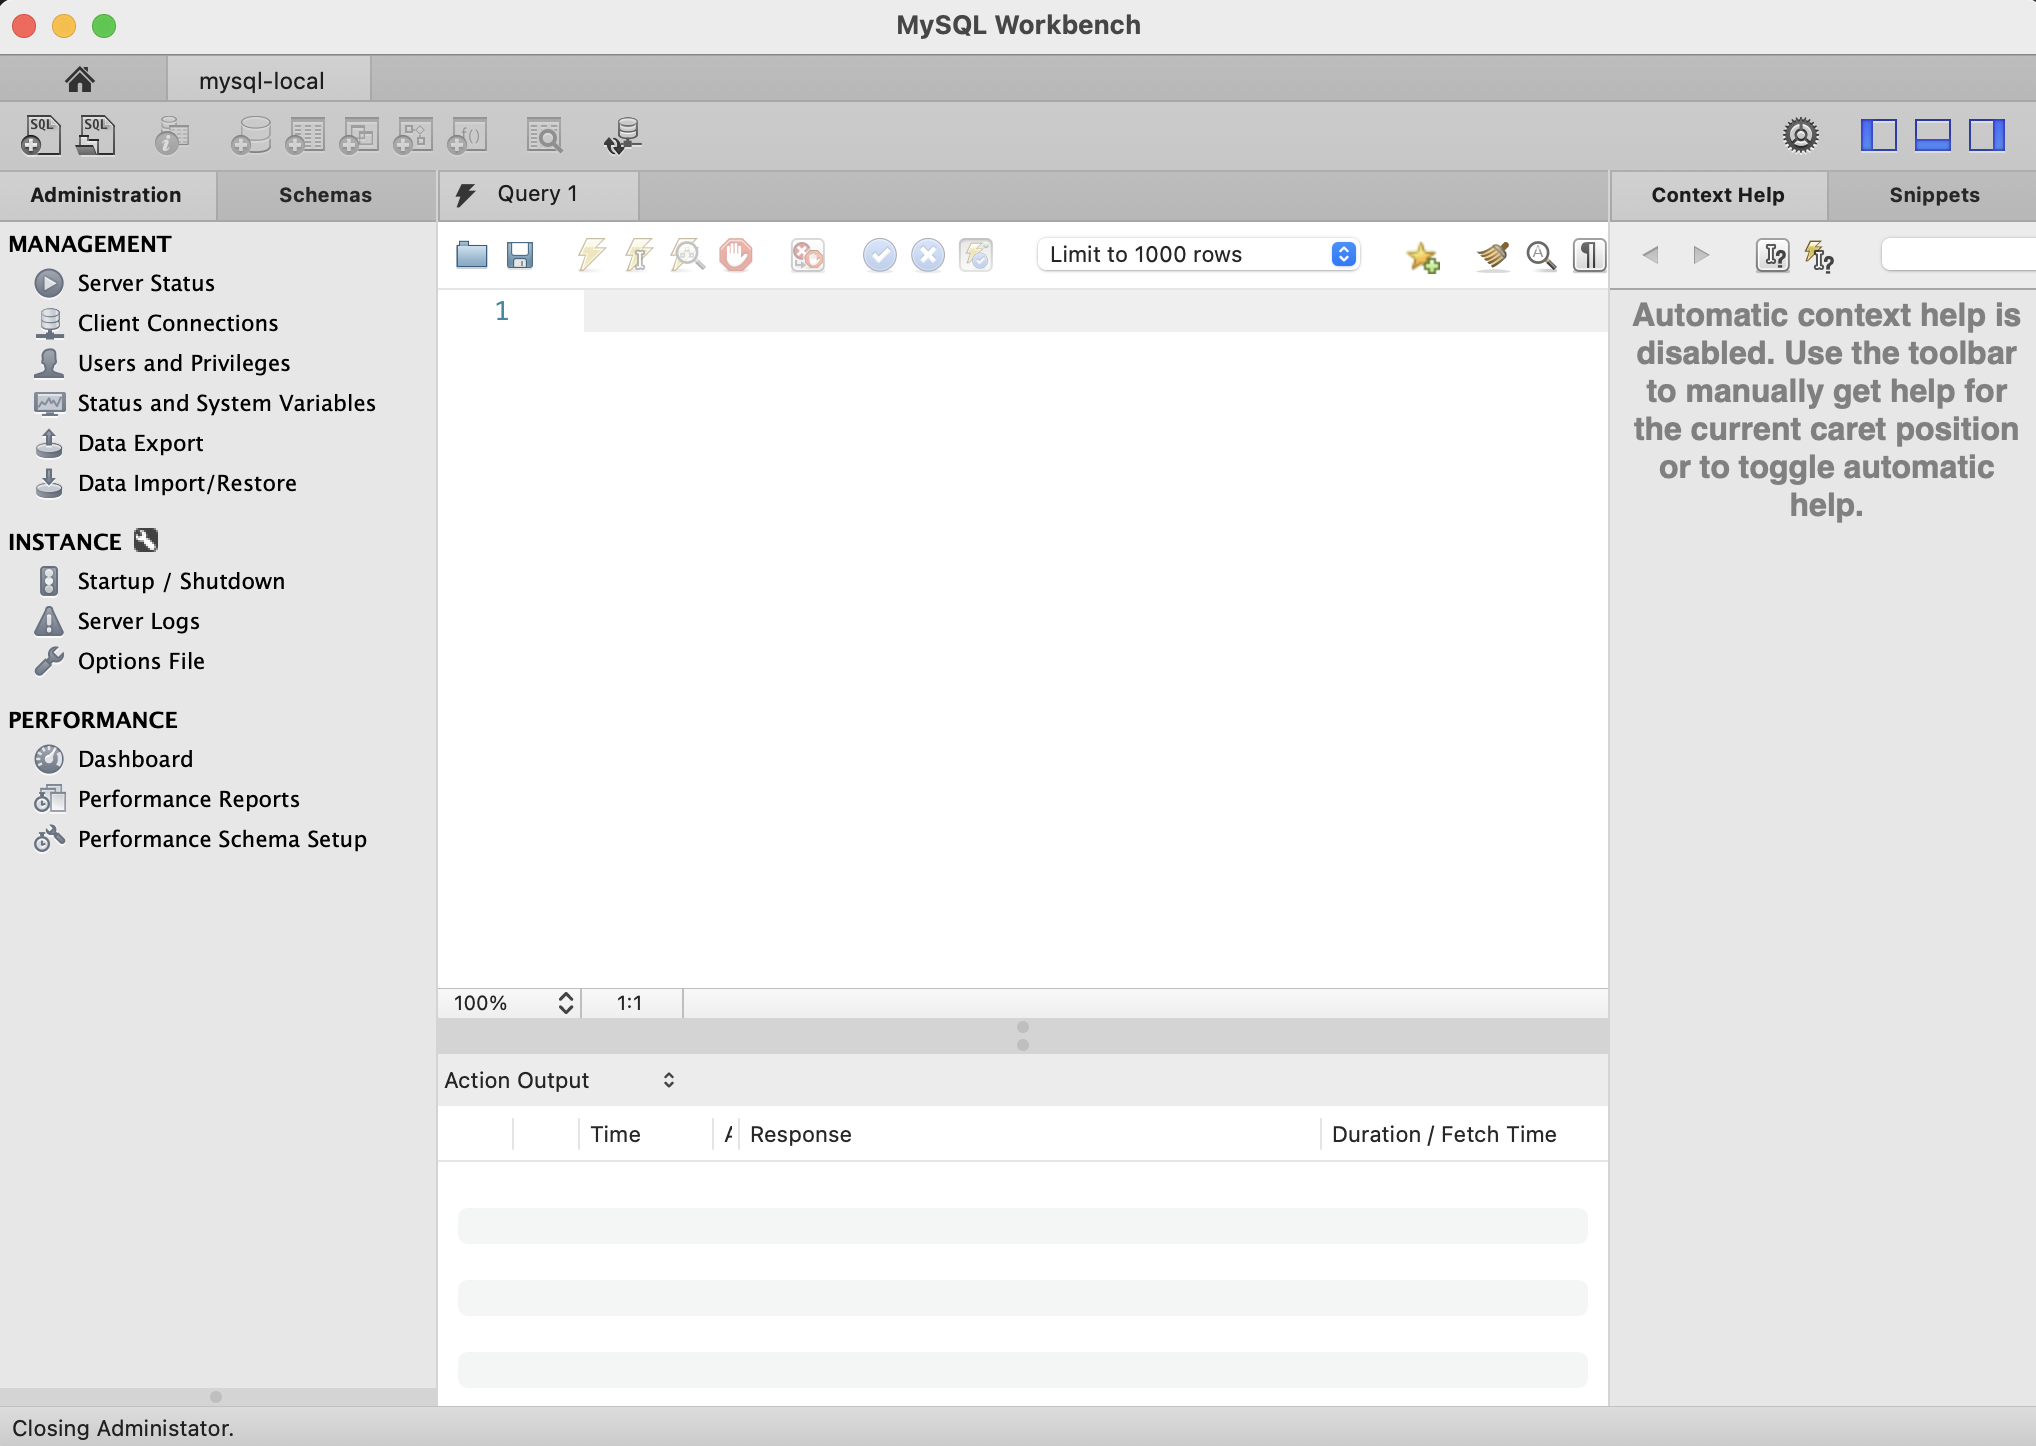
close 버튼을 클릭하고 내가 지정한 Connection name인
mysql-local를 클릭하면 실행 중인 MySQL과 연결된다.
Sakila 설치
위의 Workbench 설치 후 Schemas 에서 작업해야 sakila databse를 정상적으로 받아올 수 있다.
-
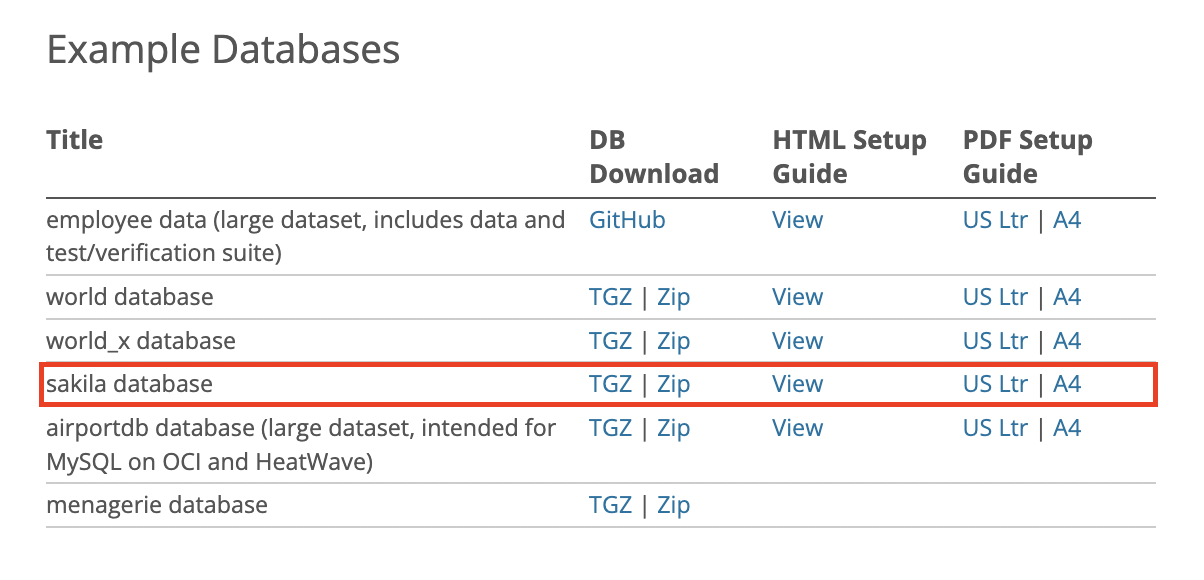
아래의 주소로 접속하여 예제 DB에서
sakila databse파일을 내려 받는다.- https://dev.mysql.com/doc/index-other.html
-
해당 버전을 다운로드한 뒤에 Mac에서 인식하기 위해서는 터미널에서 경로를 직접 설정해줘야 한다.
-
우선 mysql server를 실행한 뒤 mysql 접속하는 명령어를 입력한다.
 mysql.server start // mysql server를 실행하는 명령어
 mysql -u root -p // mysql 접속하는 명령어
➜  bin git:(stable) mysql.server start
Starting MySQL
. SUCCESS!
➜  bin git:(stable) mysql -u root -p
Enter password:
Welcome to the MySQL monitor.  Commands end with ; or \g.
Your MySQL connection id is 8
Server version: 8.0.33 Homebrew

Copyright (c) 2000, 2023, Oracle and/or its affiliates.

Oracle is a registered trademark of Oracle Corporation and/or its
affiliates. Other names may be trademarks of their respective
owners.

Type 'help;' or '\h' for help. Type '\c' to clear the current input statement.

mysql>
-
우선 경로를 설정하기 전에, 다운로드 받은
sakila-db폴더 위치로 이동한다. -
해당 폴더에서
sakila-data.sql과sakila-schema.sql정보의 위치를 복사한 뒤,
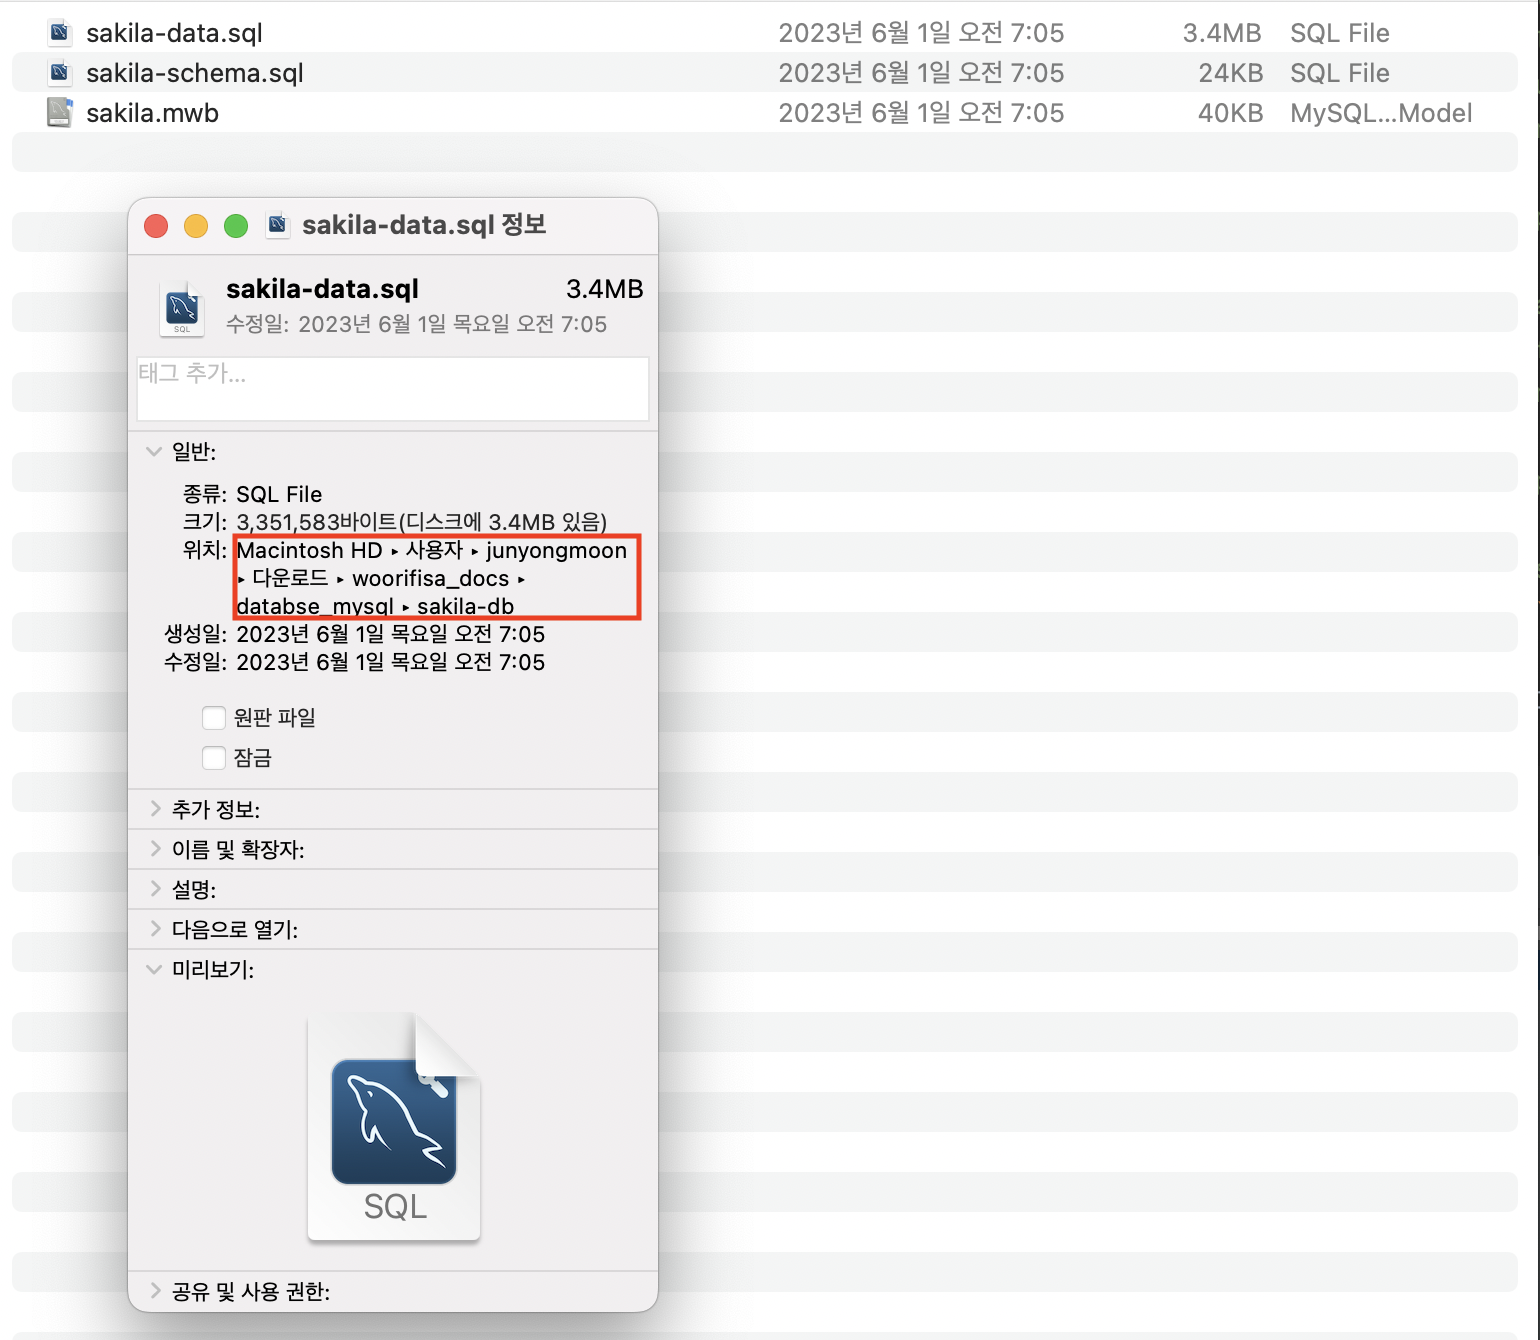
- mysql 창에 경로명을 붙여준다.
mysql> source /Users/junyongmoon/Downloads/woorifisa_docs/databse_mysql/sakila-db/sakila-data.sql
mysql> source /Users/junyongmoon/Downloads/woorifisa_docs/databse_mysql/sakila-db/sakila-schema.sql
- 그러면 아래와 같이 정상적으로 설정이 완료된다.
mysql> source /Users/junyongmoon/Downloads/woorifisa_docs/databse_mysql/sakila-db/sakila-data.sql;
Query OK, 0 rows affected (0.00 sec)

//... 중간 생략

Query OK, 0 rows affected (0.00 sec)

Query OK, 0 rows affected (0.00 sec)
sakila가 mysql에 다운로드 되었는지 확인하기 위해 아래의 명령어를 입력한다.
show databses;
- 그러면 아래와 같이 sakila가 mysql databse에 포함된 걸 확인할 수 있다.

- 확인이 되었으면 다시 mysql를 종료하고, mysql server 종료하는 명령어를 입력한다.
exit //mysql를 종료
mysql.server stop // mysql server 종료