지금의 기록이 미래의 자산이 된다.
Today's records become tomorrow's assets.-
[내 코드가 그렇게 이상한가요?] 6장. 조건 분기: 미궁처럼 복잡한 분기 처리를 무너뜨리는 방법
이 글은 내 코드가 그렇게 이상한가요? 책을 읽고 중요하다고 생각한 부분들을 중점으로 정리했습니다.
-
결론부터 말하면 조건 분기 중첩을 해결하기 위해서는 인터페이스, 전략 패턴, 정책 패턴을 사용한다.
-
세 가지에 대해서 하나씩 정리해 가보자.
조기 리턴
-
if문을 중첩으로 하면 코드의 가독성이 크게 떨어지는 문제가 있다.
-
이런 중첩 악마를 퇴치하는 방법 중 하나로
조기 리턴(early return)이 있다.조기 리턴은 조건을 만족하지 않는 경우 곧바로 리턴하는 방법이다.
-
가독성을 낮추는
else 구문도 조기 리턴으로 해결이 가능하다.- 바로 리턴하면, 사실 else 절 자체를 사용할 필요가 없다. -> else if, else문을 if문으로 바꿔서 로직을 개선할 수 있다.
switch 조건문 중복
- switch 조건문에서 중복을 해소하려면, 단일 책임 선택의 원칙 생각해봐야 한다.
단일 책임 선택의 원칙이란 소프트웨어 시스템이 선택지를 제공해야 한다면, 그 시스템 내부의 어떤 한 모듈만으로 모든 선택지를 파악할 수 있어야 한다. - 객체 지향 소프트웨어 설계 2판 원칙과 개념 -
-
따라서 조건식이 같은 조건 분기가 있으면, 여러 클래스로 작성하지 말고 하나의 클래스에 작성하자.
-
그리고 클래스가 거대해지면 관심사에 따라 작은 클래스로 분할하는 것이 중요한데, 이러한 문제를 해결할 때는
인터페이스를 사용한다. -
인터페이스는 기능 변경을 편리하게 할 수 있는 개념으로, 분기 로직을 작성하지 않고도 분기와 같은 기능을 구현할 수 있다.- 잘 활용하면 조거 분기가 많이 줄어들어 로직이 간단해진다.
-
인터페이스에는 다음과 같은 장점들이 있다.-
같은 자료형으로 사용할 수 있으므로, 굳이 자료형을 판정하지 않아도 된다.
-
조건 분기를 따로 작성하지 않고도 각각의 코드를 적절하게 실행할 수 있다.
-
자료형 판정 분기를 따로 작성하지 않아도 된다.
-
-
예를 들어 사각형과 원을 프로그램상에서 같은 도형을 다룰 수 있게 가정한다.
여기서 도형을 나타내는 Shape라는 이름의 인터페이스를 만든다.
그리고 공통 메서드도 정의한다. 도형의 면적을 나타내는 area 메서드를 정의한다.
삼각형을 나타내는 Triangle 클래스, 타원을 나타내는 Ellipse 클래스 등 새로운 도형을 추가할 수도 있다.
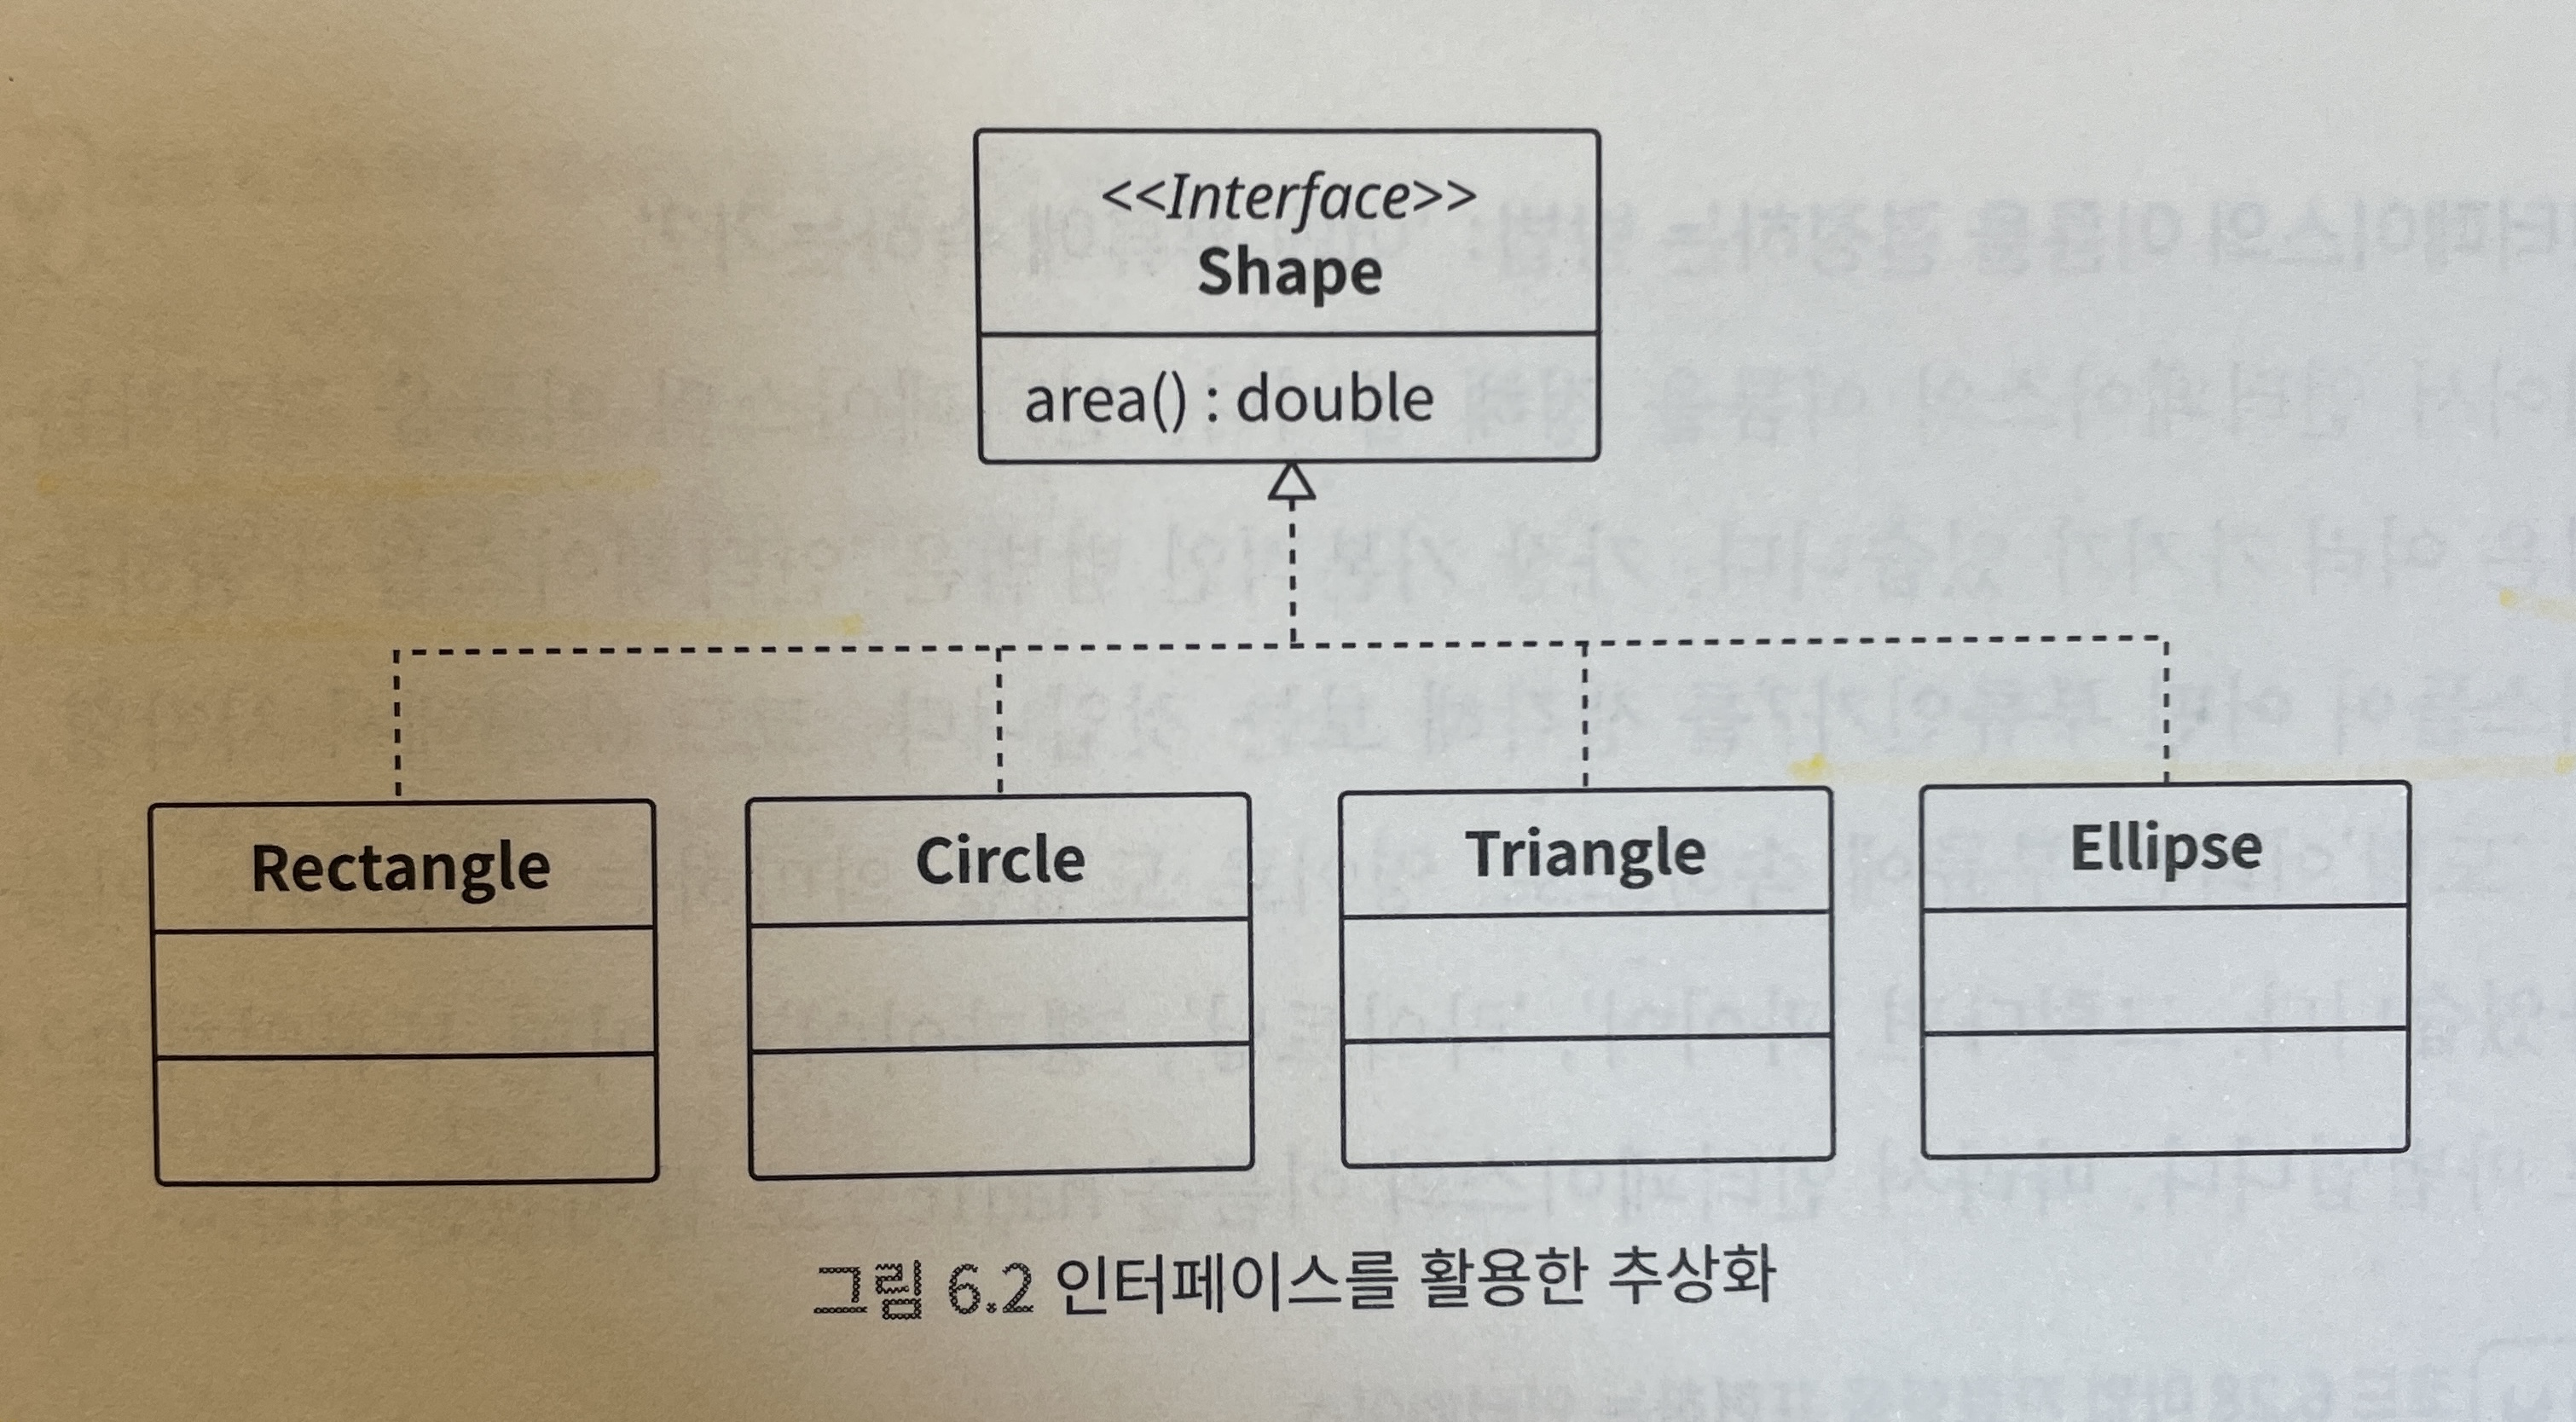
- 이처럼 인터페이스를 사용해서 처리를 한꺼번에 전환하는 설계를
전략 패턴(strategy pattern) 이라고 한다.
조건 분기 중첩
-
인터페이스는 switch 조건문의 중복을 제거할 수 있을 뿐만 아니라, 다중 중첩된 복잡한 분기를 제거하는 데 활용할 수 있다.
-
이러한 상황에서 유용하게 활용할 수 있는 패턴으로
정책 패턴(policy pattern)이 있다.정책 패턴은 조건을 부품처럼 만들고, 부품으로 만든 조건을 조합해서 사용하는 패턴이다.
-
예를 들어 다음의 상황을 가정해보자.
-
온라인 쇼핑몰에서 우수 고객인지 판정하는 로직이 있다.
-
고객의 구매 이력을 확인하고 다음 조건을 모두 만족하는 경우, 골드 회원으로 판정한다.
-
골드 회원의 구매 금액 규칙: 지금까지 구매한 금액이 100만원 이상
-
구매 빈도 규칙: 한 달에 구매하는 횟수가 10회 이상
-
반품률 규칙: 반품률이 0.1% 이하
-
-
아래의 코드처럼 하나하나의 규칙(판정 조건)을 나타내는 인터페이스를 만든다.
// 우수 고객 규칙을 나타내는 인터페이스 interface ExcellentCustomerRule { /** * @param history 구매 이력 * @return 조건을 만족하는 경우 true */ boolean ok(final PurchaseHistory history); }- 골드 회원이 되려면 3개의 조건을 만족해야 한다. 이러한 조건을 각각 아래의 코드처럼
ExcellentCustormerRule을 구현해서 만든다.
// 골드 회원의 구매 금액 규칙 class GoldCustomerPurchaseAmountRule implements ExcellentCustomerRule { public boolean ok(final PurchaseHistory history) { return 1000000 <= history.totalAmount; } } // 구매 빈도 규칙 class PurchaseFrequencyRule implements ExcellentCustomerRule { public boolean ok(final PurchaseHistory history) { return 10 <= history.purchaseFrequencyPerMonth; } } // 반품률 규칙 class ReturnRateRule implements ExcellentCustomerRule { public boolean ok(final PurchaseHistory history) { return history.returnRate <= 0.001; } }- 이어서 정책 클래스를 만든다. add 메서드로 규칙을 집약하고, complyWith All 메서드 내부에서 규칙을 모두 만족하는지 판정한다.
// 우수 고객 정책을 나타내는 클래스 class ExcellentCustomerPolicy { private final Set<ExcellentCustomerRule> rules; ExcellentCustomerPolicy() { rules = new HashSet(); } /** * 규칙 추가 * * @param rule 규칙 */ void add(final ExcellentCustomerPolicy rule) { rules.add(rule); } /** * @param history 구매 이력 * @return 규칙을 모두 만족하는 경우 true */ boolean complyWithAll(final PurchaseHistory history) { for(ExcellentCustomerRule each : rules) { if(!each.ok(history)) return false; } return true; } }-
Rule(
ExcellentCustomerRule)과 Policy(ExcellentCustomerPolicy)을 사용해서 골드 회원 판정 로직을 개선했다. -
그러면 골드 회원에 대한 정책을 아래와 같이 작성할 수 있다.
class GoldCustomerPolicy { private final ExcellentCustomerPolicy policy; GoldCustomerPolicy() { policy = new ExcellentCustomerPolicy(); policy.add(new GoldCustomerPurchaseAmountRule()); policy.add(new PurchaseFrequencyRule()); policy.add(new ReturnRateRule()); } /** * @param history 구매이력 * @return 규칙을 모두 만족하는 경우 true */ boolean complyWithAll(final PurchaseHistory history) { return policy.complyWithAll(history); } }- 여기서 골드 회원 뿐만 아니라, 실버 회원을 추가해도 구조를 크게 바꾸지 않은 채로 필요한 클래스만 추가해주면 된다.
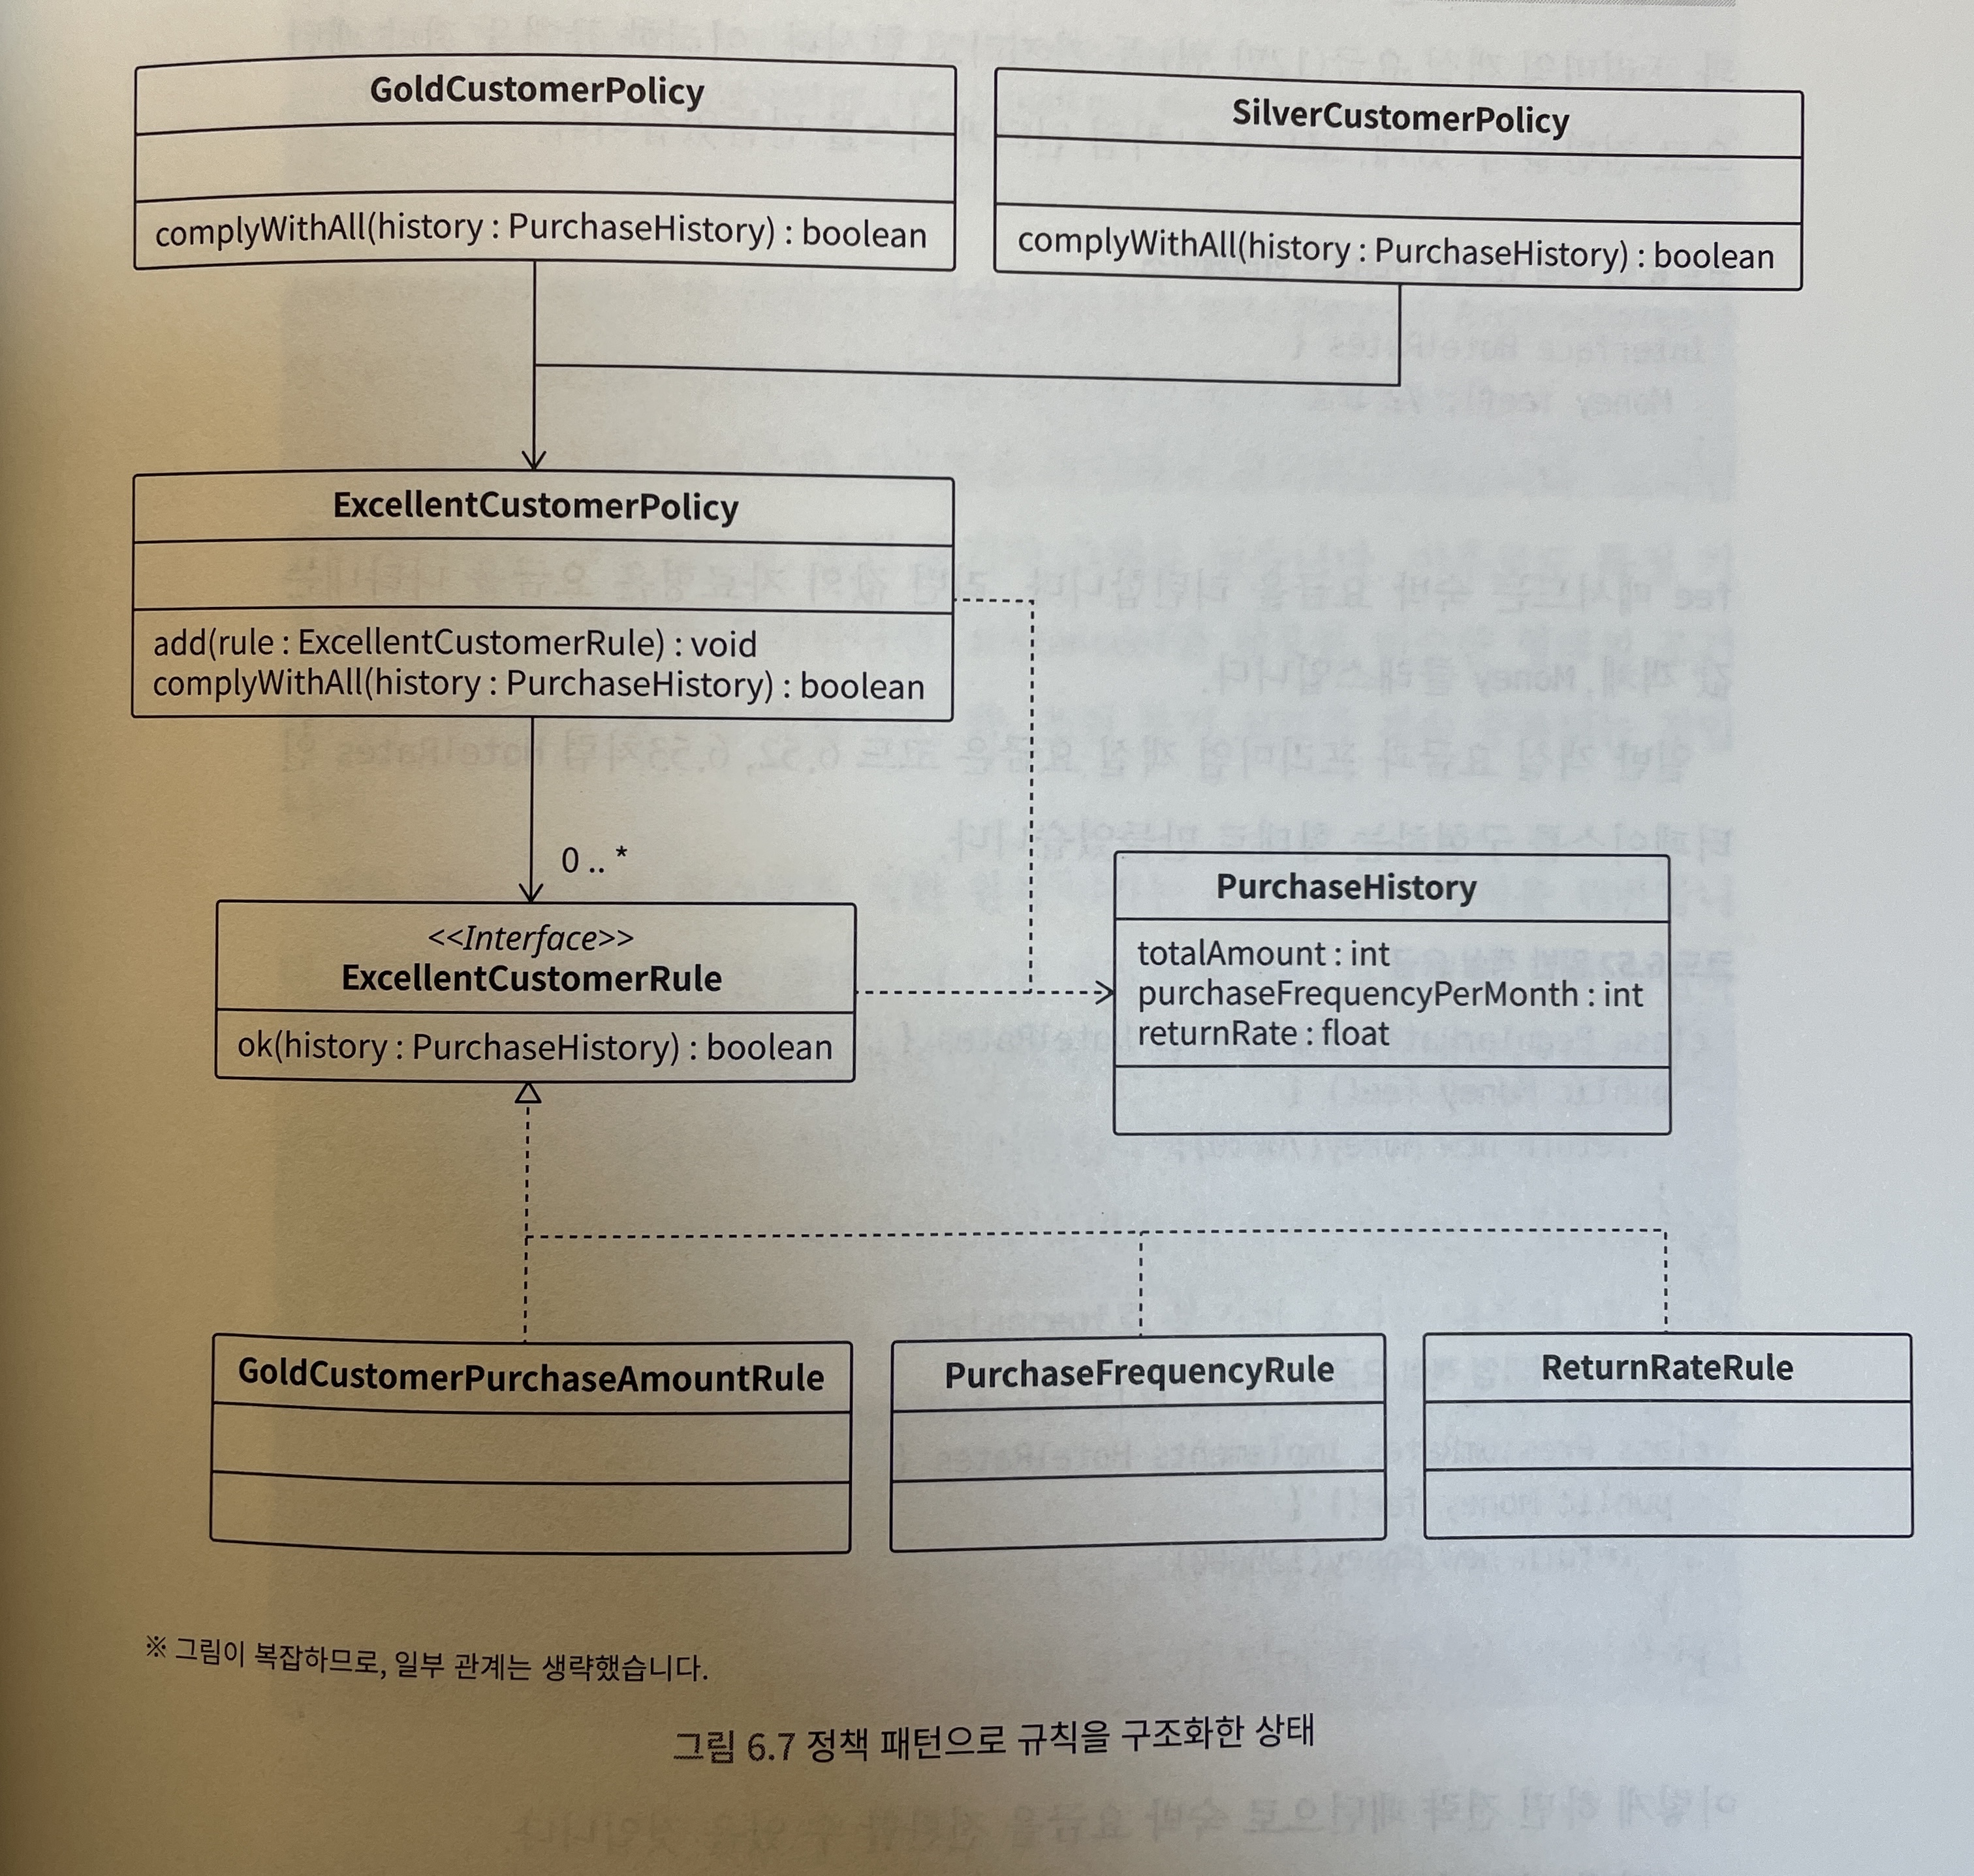
- 이처럼 조건 분기 중복과 중첩을 제거하기 위해 정책 패턴으로 규칙을 구조화한 상태로 만들면 된다.
-
-
[Programmers] 수식 최대화(dfs, 순열)
성능 요약
-
메모리: 72.3 MB, 시간: 11.40 ms - Answer Code1
-
메모리: 72.8 MB, 시간: 2.81 ms - Answer Code2
구분
- 코딩테스트 연습 > 2020 카카오 인턴십 > 수식 최대화
Answer Code1(23.11.09)
import java.util.*;

class Solution {
    static long answer = 0;
    static String op[] = {"+", "-", "*"};
    static boolean[] visited = new boolean[3];
    static ArrayList<Long> numList = new ArrayList<>(); // 피연산자, 숫자
    static ArrayList<String> opList = new ArrayList<>(); // 연산자
    static String[] perm = new String[3];

    public long solution(String expresstion) {
        String num = "";

        //num op 구분
        for(int i = 0; i < expresstion.length(); i++) {
            char c = expresstion.charAt(i);
            if(c == '*' || c == '+' || c == '-') { // 연산자인 경우
                opList.add(c+"");
                numList.add(Long.parseLong(num));
                num = ""; // num을 초기화합니다. 새로운 피연산자를 시작하기 위해서 num을 비워줍니다.
            } else { // 피연산자인 경우
                num += c;
            }
        }
        // 마지막 숫자
        numList.add(Long.parseLong(num));

        // 순열 만들기
        makePermutation(0);

        return answer;
    }

    static void makePermutation(int depth) {
        if(depth == op.length) {
            // 3개를 선택 -> 연산
            sol();
            return;
        }
        for(int i = 0; i < op.length; i++) {
            if(visited[i]) continue;
            visited[i] = true;
            perm[depth] = op[i];
            makePermutation(depth+1);
            visited[i] = false;
        }
    }

    static void sol() {
        // list 복사
        ArrayList<String> oper = new ArrayList<String>();
        oper.addAll(opList);

        ArrayList<Long> num = new ArrayList<Long>();
        num.addAll(numList);

        // 연산자 우선순위에 따라 계산
        for(int i = 0; i < perm.length; i++) {
            String op = perm[i];
            for(int j = 0; j < oper.size(); j++) {
                if(oper.get(j).equals(op)) {
                    long n1 = num.get(j);
                    long n2 = num.get(j+1);
                    long res = cal(n1, n2, op);

                    // list 갱신
                    num.remove(j+1);
                    num.remove(j);
                    oper.remove(j);

                    num.add(j, res);

                    j--;
                }
            }
        }

        answer = Math.max(answer, Math.abs(num.get(0)));
    }

    static long cal(long n1, long n2, String op) {
        long result = 0;
        switch(op) {
            case "*":
                result = n1 * n2;
                break;
            case "+":
                result = n1 + n2;
                break;
            case "-":
                result = n1 - n2;
                break;
        }
        return result;
    }
}
문제풀이 - Answer Code1
[풀이]
- 먼저 피연산자와 연산자를 분리해서 List에 넣은 후, 모든 연산자의 우선순위 순열에 대해 값을 계산해준다.
- +, *, - 3가지 연산자에 대해서 가능한 우선순위는 3!=6가지이다. dfs를 통해 이에 대한 순열을 구할 수 있다.
- 그 후 연산자 우선순위에 따라서 계산해준 후 최대값을 비교해서 얻어낸다.
초기화
class Solution {
		static long answer = 0;
    static String op[] = {"+","-","*"}; // 가능한 연산자
    static boolean[] visited = new boolean[3]; // 연산자들의 사용 여부
    static ArrayList<Long> numList = new ArrayList<>(); // 숫자(피연산자)
    static ArrayList<String> opList = new ArrayList<>(); // 연산자
    static String[] perm = new String[3]; // 순열을 만들기 위한 배열
		// 밑부분 생략
}
피연산자와 연산자 분리
//num op 구분
for(int i = 0; i < expression.length(); i++) {
    char c = expression.charAt(i);
    if(c == '*' || c == '+' || c == '-') { // 연산자인 경우
        opList.add(c+"");
        numList.add(Long.parseLong(num));
        num = ""; // num을 초기화합니다. 새로운 피연산자를 시작하기 위해서 num을 비워줍니다.
    } else { // 피연산자인 경우
        num += c;
    }
}
연산자인 경우와 피연산자인 경우를 조건문으로 구분했다.
- 연산자인 경우는 문자 변환하여
opList에 추가한다.numList.add(Long.parseLong(num));은 지금까지 쌓인 숫자를Long타입으로 변환하여numList에 추가한다는 의미이다.num = “”;을 한 이유는 새로운 피연산자를 시작하기 위해서num을 비워주는 것을 의미한다.
- 피연산자인 경우는 현재 숫자를
num에 더해준다.- 이렇게하면 다음 반복문에서 if문에 있는
numList.add(Long.parseLong(num));에서 해당 숫자를numList에 넣어주게 된다.
- 이렇게하면 다음 반복문에서 if문에 있는
- 마지막에 쌓인 숫자를
Long타입으로 변환하여numList에 추가한다.
이 코드는 주어진 수식을 순회하면서 연산자와 피연산자를 구분하여
opList와numList에 저장하는 역할을 한다.예를 들어, 수식이 “100-200300-500+20”인 경우에는
opList에는 [”-“, “”, “-“, “+”]이 저장되고,numList에는 [100, 200, 300, 500, 20]이 저장된다.dfs를 통해 순열 처리
static void makePermutation(int depth) {
    if(depth == op.length) {
        // 3개를 선택 -> 연산
        sol();
        return;
    }
    for(int i = 0; i < op.length; i++) {
        if(visited[i]) continue;
        visited[i] = true;
        perm[depth] = op[i];
        makePermutation(depth+1);
        visited[i] = false;
    }
}
위 코드는 연산자의 우선순위의 모든 가능한 순열을 생성하는 메서드다.
makePermutation메서드는 재귀적으로 호출된다.- if문에서는 현재 순열의 길이가 연산자의 총 개수와 같다면, 즉 모든 연산자에 대한 순열이 만들어진 경우다.
- 그런 경우
sol()메서드를 호출하여 순열에 대한 연산을 수행한다.
- 그런 경우
- for문에서는 가능한 모든 연산자를 대상으로 반복문을 실행한다.
visited[i] = true;의 경우 현재 연산자op[i]를 사용한다는 의미이다.- 그리고
makePermutation(depth+1);을 통해 더 깊은 위치로 재귀 호출을 해서 다음 연산자를 선택한다. visited[i] = false;는 현재 연산자op[i]를 다시 사용하지 않는 상태로 되돌린다.
연산자 우선순위에 따라서 계산해준 후 최대값을 비교
static void sol() { // list 복사 ArrayList<String> oper = new ArrayList<String>(); oper.addAll(opList); ArrayList<Long> num = new ArrayList<Long>(); num.addAll(numList); // 연산자 우선순위에 따라 계산 for(int i = 0; i < perm.length; i++) { String op = perm[i]; for(int j = 0; j < oper.size(); j++) { if(oper.get(j).equals(op)) { long n1 = num.get(j); long n2 = num.get(j+1); long res = cal(n1, n2, op); // list 갱신 num.remove(j+1); num.remove(j); oper.remove(j); num.add(j, res); j--; } } } answer = Math.max(answer, Math.abs(num.get(0))); } static long cal(long n1, long n2, String op) { long result = 0; switch(op) { case "*": result = n1 * n2; break; case "+": result = n1 + n2; break; case "-": result = n1 - n2; break; } return result; }oper라는 새로운 문자열 리스트를 생성하고, 연산자 리스트의 복사본을 만든다.num이라는 새로운 Long 타입의 리스트를 생성하고 숫자 리스트의 복사본을 만든다.연산자 우선순위의 모든 경우를 for문을 통해 반복한다.
- 현재 순열에서 선택한 연산자를
op에 저장한다. - 연산자 리스트를 순회하면서 현재 연산자
op와 연산자 리스트의 원소가 일치하는 경우, 현재 연산자 앞 뒤에 있는 두 숫자를n1과n2에 저장한다. - 그런 다음
cal메서드를 호출하여n1과n2를op로 계산한 결과를res에 저장한다. - 계산에 사용된 두 숫자와 연산리스트를 리스트에서 제거하고
num.add(j, res);**을 통해 계산 결과를 원래 순서에 넣는다.- 여기서
res값을j인덱스 위치에 추가하는 역할을 한다. - 예를 들어,
num리스트가 [1,2,3,4,5]이고,j가 2이고,res가 10이라면, 실행 후num리스트는 [1,2,10,3,4,5]가 된다.
- 여기서
- 리스트에서 요소가 제거되었으므로
j를 감소시켜서 다음 순회에 올바른 인덱스가 가리키도록 한다.
static long cal(long n1, long n2, String op) { ... }: 주어진 두 숫자와 연산자로 계산을 수행하는 메서드다.Answer Code2(23.11.09)
import java.util.ArrayList;
import java.util.Arrays;
import java.util.List;
import java.util.stream.Collectors;

class Solution {
    static List<List<String>> list = new ArrayList<>();
    public long solution(String expression) {
        long answer = 0;
        boolean[] visited = new boolean[3];
        String[] operationTypes = {"-","+","*"};
        // 연산자 우선순위 모든 경우의 수 계산
        permutation(new ArrayList<>(), operationTypes, visited);

        // 연산자를 " "로 치환 후 split 값들을 Long 값으로 변환 후 toList
        List<Long> numbers = Arrays.stream(expression.replaceAll("-|\\*|\\+"," ").split(" "))
                .map(Long::parseLong).collect(Collectors.toList());
        // 숫자를 공백으로 치환 후 toList
        List<String> collect = Arrays.stream(expression.replaceAll("[0-9]", "").split(""))
                .collect(Collectors.toList());

        // 우선순위 모든 경우의 수에 따른 max 연산 값
        for (List<String> strings : list) {
            answer = Math.max(answer, solve(strings, numbers, collect));
        }
        return answer;
    }

    static long solve(List<String> strings, List<Long> numbers, List<String> operations) {
        // 리스트에 remove 메서드를 사용하기 위해서 복사
        List<Long> numbersClone = new ArrayList<>(numbers);
        List<String> operationsClone = new ArrayList<>(operations);

        for (int i = 0; i < strings.size(); i++) {
            String operation = strings.get(i); // 현재 순위의 연산자

            for(int j = 0; j < operationsClone.size(); j++) {
                // 현재 순위의 연산자와 같은 경우
                if(operation.equals(operationsClone.get(j))) {
                    // 연산자 앞의 수와 뒤의 수를 구한뒤 연산
                    long front = numbersClone.get(j);
                    long back = numbersClone.get(j + 1);
                    long temp = calc(front, back, operation);

                    // 연산에 사용된 두수를 제거
                    numbersClone.remove(j+1);
                    numbersClone.remove(j);

                    // 연산에 사용된 연산자 제거
                    operationsClone.remove(j);

                    // 연산된 값을 추가
                    numbersClone.add(j, temp);

                    // 연산이 진행되는 경우 2개 -> 1개 가되므로 리스트의 사이즈에 변경이 일어남
                    // 이를 맞추기 위해서 j를 --하여 다움 for문에서 범위를 벗어나지 않게 함
                    j--;
                }
            }
        }
        // 절대값으로 변환해서 리턴
        return Math.abs(numbersClone.get(0));
    }

    static void permutation(ArrayList<String> arrayList, String[] orders, boolean[] visited) {
        if(arrayList.size() == 3) {
            list.add(arrayList);
            return;
        }

        for (int i = 0; i < orders.length; i++) {
            if (!visited[i]) {
                ArrayList<String> temp = new ArrayList<>(arrayList);
                temp.add(orders[i]);
                visited[i] = true;
                permutation(temp, orders, visited);
                visited[i] = false;
            }
        }
    }

    static long calc(long one, long two, String calc) {
        switch (calc) {
            case "-" :
                return one - two;
            case "+" :
                return one + two;
            default :
                return one * two;
        }
    }
}
Review
-
해당 문제를 어떻게 접근해야 할지 감이 오질 않아서 다른 사람의 풀이를 참고했고, 해당 코드를 이해하느라 시간이 오래걸렸다.
-
순열과 dfs을 이용하여 문제를 풀었는데, 해당 코드를 이해하는데도 어려워서 해당 문제는 여러 번 복습해야겠다는 생각이 들었다.
-
두번째 정답은 첫번째에 비해 성능적으로 5배나 좋게 되어있어서 다음에 기회되면 두번째 풀이방식으로도 접근해야겠다.
Reference
- https://stritegdc.tistory.com/232 - Answer Code1
-
-
[내 코드가 그렇게 이상한가요?] 4장. 불변 활용하기: 안정적으로 동작하게 만들기
이 글은 내 코드가 그렇게 이상한가요? 책을 읽고 정리한 내용을 바탕으로 작성하였습니다.
재할당
-
재할당은 변수에 값을 다시 할당하는 것을 말하며,파괴적 할당이라고도 말한다.재할당은 변수의 의미를 바꿔 추측하기 어렵게 만들고,언제 어떻게 변경되는지 추척하기 힘들게 한다.
-
따라서
재할당을 막기 위해서는변수에 final 수식자를 붙여준다.마찬가지로,
매개변수에도 final 수식자를 붙인다.
가변으로 인해 발생하는 의도하지 않는 영향
- 인스턴스가 가변이면 다른 부분에 의도하지 않은 영향을 주기 쉽다.
부수 효과의 단점
-
함수의
부수 효과는 함수가 매개변수를 전달받고, 값을 리턴하는 것 이외에 외부 상태(인스턴스 변수)를 변경하는 것을 가리킨다. -
조금 더 구체적으로 설명하면, 함수(메서드)에는 주요 작용과 부수 효과가 있다.
-
주요 작용: 함수(메서드)가 매개변수를 전달받고, 값을 리턴하는 것
-
부수 효과: 주요 작용 이외의 상태 변경을 일으키는 것
-
-
여기서
상태 변경이란 함수 밖에 있는 상태를 변경하는 것을 의미한다. 예를 들어 다음과 같은 것이다.-
인스턴스 변수 변경
-
전역 변수 변경
-
매개변수 변경
-
파일 읽고 쓰기 같은 I/O 조작
-
-
작업 실행 순서에 의존하는 코드는 결과를 예측하기 힘들며, 유지 보수하기 힘들다.
함수의 영향 범위 한정하기
-
부수 효과가 있는 함수는 영향 범위를 예측하기 힘들다.
-
따라서 예상치 못한 동작을 막으려면, 함수가 영향을 주거나 받을 수 있는 범위를 한정하는 것이다.
-
함수는 다음 동작을 만족하도록 설계하는 것이 좋다.
-
데이터(상태)는 매개변수로 받는다.
-
상태를 변경하지 않는다.
-
값은 함수의 리턴 값으로 돌려준다.
-
-
따라서 매개변수로 상태를 받고, 상태를 변경하지 않고, 값을 리턴하기만
함수가 이상적이다.
불변으로 만들어서 예기치 못한 동작 막기
-
지금까지 설명한 방식에 따라, 예상하지 못한 동작을 막기 위해 불변을 기반으로 코드를 설계한다.
-
부수 효과의 자체를 없애는 방법은 간단하다.
인스턴스 변수에 final 수식자를 붙여서 불변으로 만들면 된다.
원시(기본) 타입(primitive type): byte, char, short, int, long, float, double, boolean
참조 타입(reference type): 배열 타입, 열거 타입, 클래스, 인터페이스
참고로, int형과 같은
원시 타입(primitive)은 참조값이 존재하지 않기 때문에 외부에서도 그대로불변으로 존재하게 된다.하지만,
참조 타입인 객체나 Array, List와 같은 컬렉션일 경우에는불변을 보장하려면 setter를 포함하지 않아야 하며, getter 사용시 방어적 복사를 통해 값을 전달해야 한다. 또한, 참조 변수 객체 내부 또한 불변이어야 불변이 성립한다.-
불변 변수로 만들면 변경할 수 없기 때문에, 변경된 값을 사용하고 싶다면 새로운 값을 가진 새로운 인스턴스 변수를 만들어서 사용해야 한다.
-
아래 코드의 reinforce 메서드와 disable 메서드처럼
AttackPower인스턴스를 새로 생성하고 리턴하는 구조로 변경한다.
class AttackPower() {
    static final int MIN = 0;
    final int value;    // final로 불변으로 만들기

    AttackPower(final int value) {
        if(value < MIN) {
            throw new IllegalArgumentException();
        }

        this.value = value;
    }

    /**
     * 공격력 강화하기
     * @param increment 공격력 증가량
     * @return 증가된 공격력
     */
    AttackPower reinforce(final AttackPower increment) {
        return new AttackPower(this.value + increment.value); // 인스턴스를 새로 생성하고 리턴하는 구조로 변경
    }

    /**
     * 무력화하기
     * @return 무력화한 공격력
     */
    AttackPower disable() {
        return new AttackPower(MIN); // 인스턴스를 새로 생성하고 리턴하는 구조로 변경
    }
}
불변과 가변은 어떻게 다루어야 할까?
-
지금까지 설명한 것처럼 변수를 불변으로 만들면 다음과 같은 장점이 있다.
-
변수의 의미가 변하지 않으므로, 혼란을 줄일 수가 있음.
-
동작을 안정적이게 되므로, 결과를 예측하지 쉬움
-
코드의 영향 범위가 한정적이므로, 유지 보수가 편리해짐
-
-
따라서 기본적으로는
불변으로 설계하는 것이 좋다. (이 책에서도 불변을 표준 스타일로 사용한다)
가변으로 설계해야 하는 경우
-
기본적으로 불변으로 설계하는 것이 좋지만, 가변이 필요한 경우도 있다.
-
바로 성능(performance)이 중요한 경우이다.
-
대량의 데이터를 처리해야 하는 경우,
-
이미지를 처리하는 경우
-
리소스에 제약이 큰 임베디드 소프트웨어를 다루는 경우
-
-
위와 같은 예시에서는 가변을 사용하는 것이 좋을 수 있다.
-
불변이라면 값을 변경할 때 인스턴스를 새로 생성해야 한다.
-
만약 크기가 큰 인스턴스를 새로 생성하면서 시간이 오래 걸려 성능에 문제가 생긴다면 불변 보다는 가변을 사용하는 것이 좋다.
상태를 변경하는 메서드 설계하기
-
어떤 게임에서 히트포인터에 대한 기본적인 조건은 다음과 같다.
-
히트포인트는 0이상
-
히트포인트가 0이 되면, 사망 상태로 변경
-
-
히트포인트가 0이 될때 뮤테이터(mutater)를 통해 사망 상태로 변경하자.
뮤테이터(mutater): 상태를 변화시키는 메서드
class Hitpoint {
    ...

    /**
     * 대미지 받는 처리
     * @param damageAmount 대미지 크기
     */
    void damage(final int damageAmount) {
        hitPoint.damage(damageAmount) {
            if(hitPoint.isZero) {
                states.add(StateType.dead); // 사망 상태로 변경
            }
        }
    }
}
Reference
-
-
우선순위 큐(Priority Queue) 개념 및 사용법 정리
Prologue
해당 문제를 풀면서 우선순위 큐에 대한 개념과 사용법을 다시 한번 짚고 넘어가고자 정리하게 되었다.
Priority Queue란
-
우선순위 큐는 우선순위가 가장 높은 데이터를 가장 먼저 삭제하는 자료구조이다. -
우선순위 큐는 데이터를 우선순위에 따라 처리하고 싶을 때 사용합니다.
- ex) 물건 데이터를 자료구조에 넣었다가 가치가 높은 물건부터 꺼내서 확인해야 하는 경우
-
우선순위 큐를 구현하는 방법은 다양하다.
-
(1) 단순히
리스트(List)를 이용하여 구현할 수 있다. -
(2)
힙(Heap)을 이용하여 구현할 수 있다.
-
-
데이터의 개수가 N개일 때, 구현 방식에 따라서 시간 복잡도를 비교한 내용은 다음과 같다.
-
리스트 - 삽입 시간: O(1), 삭제 시간: O(N)
-
힙 - 삽입 시간: O(logN), 삭제 시간: O(logN)
-
-
단순이 N개의 데이터를 힙에 넣었다가 모두 꺼내는 작업은 정렬과 동일하다. (힙 정렬)
- 이 경우 시간 복잡도는 O(NlogN) 이다.
-
정리하면, 우선순위 큐는 배열, 연결리스트, 힙으로 구현이 가능하나 이 중 힙(Heap)으로 구현하는 것이 가장 효율적이다.
-
데이터를 삽입할 때 우선순위를 기준으로 최대 힙 또는 최소 힙을 구성하고
데이터를 꺼낼 때 루트 노드를 얻어낸 뒤
루트 노드를 삭제할 때는 빈 루트 노드 위치에 맨 마지막 노드를 삽입한 후
아래로 내려가면서 적절한 자리를 찾아 옮기는 방식으로 진행한다.
-
최대 값이 우선순위인 큐 = 최대힙, 최소 값이 우선순우이인 큐 = 최소 힙
힙(Heap) 특징
-
힙은 완전 이진 트리 자료구조의 일종이다. -
힙에서는 항상 루트 노드(root node)를 제거한다.
-
최소 힙(min heap)
-
루트 노드가 가장 작은 값을 가진다.
-
따라서 값이 작은 데이터가 우선적으로 제거된다.
-
-
최대 힙(max heap)
-
루트 노드가 가장 큰 값을 가진다.
-
따라서 값이 큰 데이터가 우선적으로 제거된다.
-
완전 이진 트리(Complete Binary Tree)
-
완전 이진 트리란 루트 노트부터 시작하여 왼쪽 자식 노드, 오른쪽 자식 노드 순서대로 데이터가 차례대로 삽입되는 트리를 의미한다.
-
원소를 제거할 때는 가장 마지막 노드가 루트 노드의 위치에 오도록 한다.
Priority Queue 특징
-
높은 우선순위의 요소를 먼저 꺼내서 처리하는 구조이다. (우선순위 큐에 들어가는 원소는 비교가 가능한 기준이 있어야 한다)
-
내부 요소는 힙으로 구성되어
이진 트리이루어져 있다. -
내부 구조가 힙으로 구성되어 있기에 시간 복잡도는
O(NlogN)이다. -
우선순위를 중요시해야 하는 상황에서 주로 쓰인다.
Priority Queue 선언
Priority Queue를 사용하려면java.util.PriorityQueue를 import해야 한다.
import java.util.PriorityQueue;
import java.util.Collections;

public class PriorityQueue() {
    //낮은 숫자가 우선 순위인 int 형 우선순위 큐 선언
    PriorityQueue<Integer> priorityQueueLowest = new PriorityQueue<>();

    //높은 숫자가 우선 순위인 int 형 우선순위 큐 선언
    PriorityQueue<Integer> priorityQueueHighest = new PriorityQueue<>(Collections.reverseOrder());
}
Priority Queue 동작
Priority Queue 값 추가하기
public class PriorityQueueDemo { public static void main(String[] args) { PriorityQueue<Integer> pq = new PriorityQueue<>(); // 1, 15, 10, 21, 25, 18, 8 값 추가 pq.add(1); pq.add(15); pq.offer(10); pq.add(21); pq.add(25); pq.offer(18); pq.add(8); System.out.print(pq); // 결과 출력: [1, 15, 8, 21, 25, 18, 10] } }-
우선순위 큐에 값을 추가하는 방법은
add(),offer()메서드가 있다.add(value)메서드는 삽입이 성공하면 true를 반환하고, 큐에 여유 공간이 없어 삽입에 실패하면 IllegalStateException 을 발생시킨다.
-
add()메서드는 Collection 클래스에서 가져오는 메서드라면,offer()메서드는 Queue 클래스에서 가져오는 메서드다. -
결과를 보면 값을 입력한 순서가 아닌 우선순위 큐만의 정렬방식으로 출력된다.
-
결과: 1, 15, 8, 21, 25, 18, 10
추가할 때 우선순위 큐의 동작은 아래와 같은 과정을 통해 정렬이 된다.
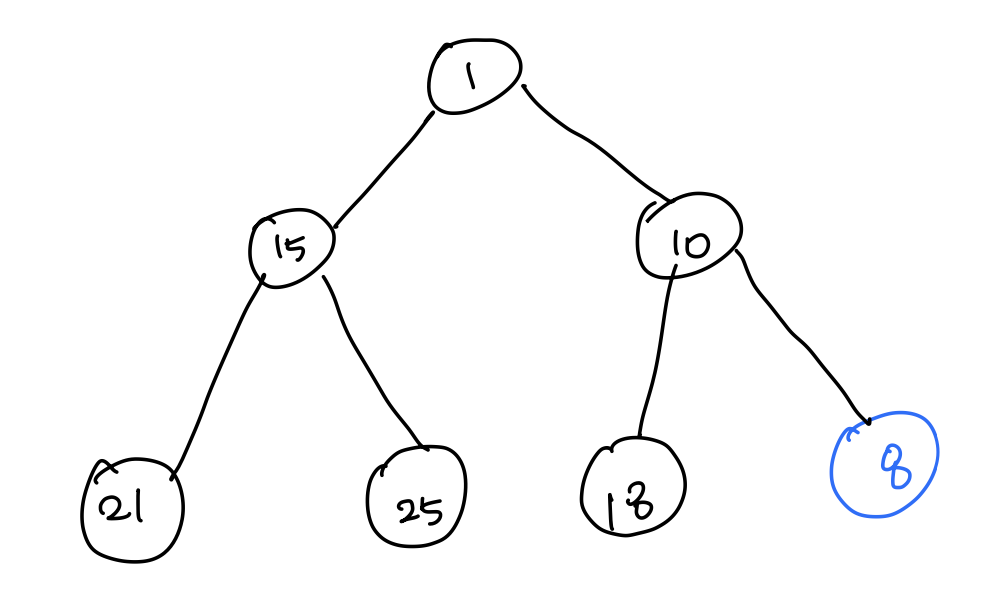
- [1] 우선순위 큐에 숫자 8을 추가한다. 숫자 8은 부모와 비교해서 부모보다 작은 값인 경우 스왑한다. -> 10과 8의 위치가 변경된다.
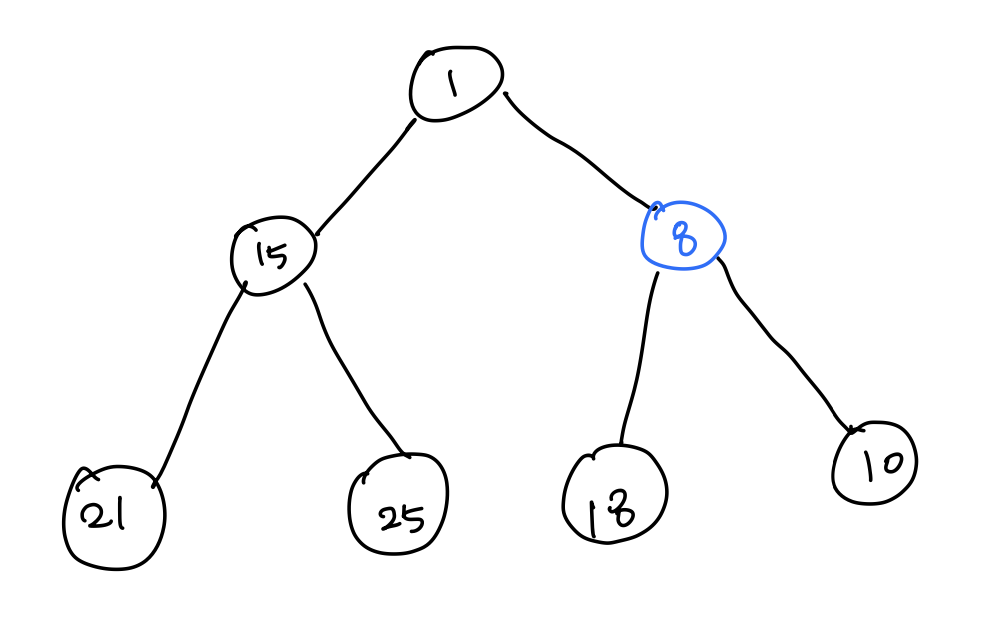
- [2] 8은 다시 부모의 값과 비교한다. 하지만 자식 값이 더 크므로 스왑하지 않는다.
Priority Queue 값 삭제하기
public class PriorityQueueDemo { public static void main(String[] args) { PriorityQueue<Integer> pq = new PriorityQueue<>(); // 1, 15, 10, 21, 25, 18, 8 값 추가 pq.add(1); pq.add(15); pq.offer(10); pq.add(21); pq.add(25); pq.offer(18); pq.add(8); System.out.println(pq); // 결과 출력: [1, 15, 8, 21, 25, 18, 10] pq.poll(); System.out.println(pq); // 결과 출력: [8, 15, 10, 21, 25, 18] pq.remove(); pq.remove(1); System.out.println(pq); // 결과 출력: [10, 15, 18, 21, 25] pq.clear(); System.out.println(pq); // 결과 출력: [] } }-
우선순위 큐에서 값을 삭제하는 방법은 여러가지가 있다.
-
poll(),remove()메서드를 사용하면 우선순위가 가장 높은 값을 제거한다.-
poll()메서드는 첫번째 값을 반환하고 제거한다. 만약 우선순위 큐가 비어있다면 null을 반환한다. -
remove()메서드는 첫번째 값을 제거한다.
-
-
clear()메서드를 사용하면 우선순위의 큐의 모든 값을 삭제한다. (=초기화) -
결과를 보면 첫 번째 우선순위를 삭제하면 하나씩 밀리는 것이 아니라 우선순위를 재정렬하는 것을 확인할 수 있다.
삭제할 때, 우선순위 큐의 동작은 아래와 같은 과정을 통해 정렬이 된다.
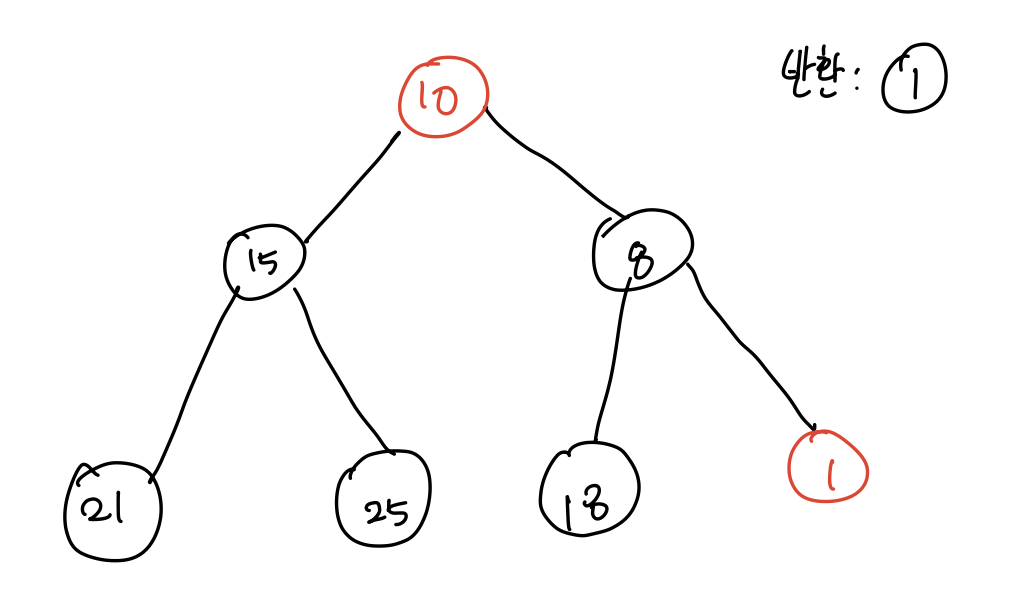
- [1] 우선순위 가장 높은 루트 노드인 (1)를 반환하고, 마지막 노드인 (10)이 스왑하고 난 뒤에 제거한다.
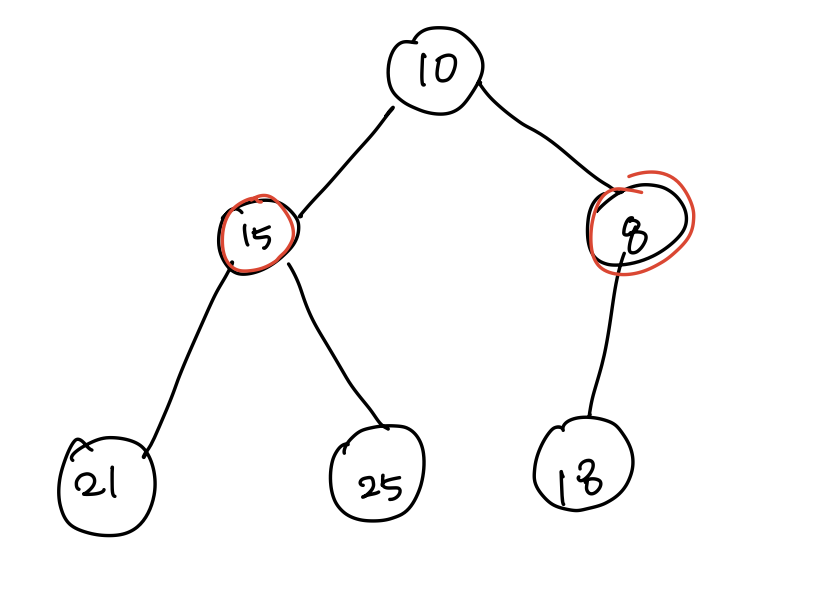
- [2] (1)을 제거하고 부모 노드 (10), 자식 노드(15, 8)과 비교하여 더 작은 값이 부모 노드로 올라간다.
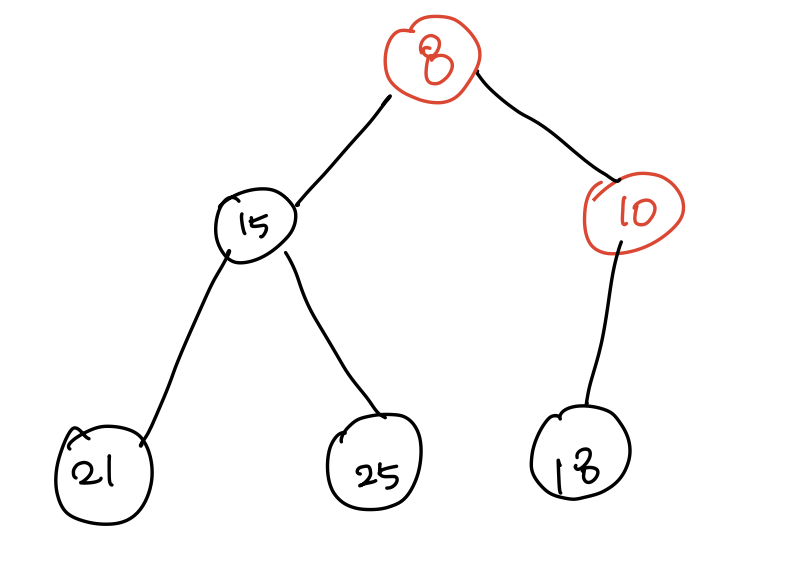
- 이렇게 다시 우선순위가 정렬된다.
Priority Queue 값 출력하기
public class PriorityQueueDemo { public static void main(String[] args) { PriorityQueue<Integer> pq = new PriorityQueue<>(); // 1, 15, 8, 21, 25, 18, 10 값 추가 pq.add(1); pq.add(15); pq.offer(10); pq.add(21); pq.add(25); pq.offer(18); pq.add(8); System.out.println(pq.peek()); // 결과 출력: 1 Iterator iterator = pq.iterator(); while(iterator.hasNext()) System.out.print(iterator.next() + " "); // 결과 출력: 1 15 8 21 25 18 10 } }-
Priority Queue에서
peek()메서드를 사용하면 우선순위가 가장 높은 값이 출력된다. -
전체 Queue의 값을 가져오려면 Iterator() 메서드를 사용하여 가져오면 된다.
Reference
-
-
[Programmers] 176962. 과제 진행하기
성능 요약
- 메모리: 84.5 MB, 시간: 6.34 ms
구분
- 코딩테스트 연습 > 연습문제 > 우선순위 큐, 스택
Answer Code1(23.11.03)
import java.util.*;

class Solution {

    static class Task {
        private String name;
        private int start;
        private int playtime;

        public Task(String name, int start, int playtime) {
            this.name = name;
            this.start = start;
            this.playtime = playtime;
        }

        public Task(String name, int playtime) {
            this.name = name;
            this.playtime = playtime;
        }
    }

    public List<String> solution(String[][] plans) {
    	// 정답을 저장할 리스트
        List<String> answer = new ArrayList<>();

        // 해야할 과제들을 시작시간 순으로 저장
        PriorityQueue<Task> pq = new PriorityQueue<>(
            (o1, o2) -> (o1.start - o2.start)
        );

        for(int i = 0; i < plans.length; i++) {
            String name = plans[i][0];

            String[] str = plans[i][1].split(":");
            int h = Integer.parseInt(str[0]);
            int m = Integer.parseInt(str[1]);
            int start = (h * 60) + m; // '분' 기준으로 합침

            int time = Integer.parseInt(plans[i][2]);

            pq.add(new Task(name, start, time));
        }

        // 잠시 멈춘 과제를 저장
        Stack<Task> remainingTasks = new Stack<>();

        while(!pq.isEmpty()) {
            Task currentTask = pq.poll();

            String curName = currentTask.name;
            int curStart = currentTask.start;
            int curPlaytime = currentTask.playtime;

            // 현재 시각
            int currentTime = curStart;

            // 1) 새로운 과제가 남아있는 경우(진행중이던 과제 제외)
            if(!pq.isEmpty()) {
                Task nextTask = pq.peek();

                // 1-1) 지금 과제를 끝내고도 다음 과제 시작까지 시간이 남는 경우
                if(currentTime + curPlaytime < nextTask.start) {
                    answer.add(curName);
                    currentTime += curPlaytime;

                    // 잠시 멈춘 과제가 있는 경우, 남는 시간동안 멈췄던 과제 해결
                    while(!remainingTasks.isEmpty()) {
                        Task rem = remainingTasks.pop();

                        // 다음 새로운 과제 시작전까지 다 끝낼수 있는 경우
                        if(currentTime + rem.playtime <= nextTask.start) {
                            currentTime += rem.playtime;
                            answer.add(rem.name);
                            continue;
                        }
                        // 다음 새로운 과제 시작전까지 못 끝내는 경우
                        else {
                            int t = rem.playtime - (nextTask.start - currentTime);
                            // 추가로 한 시간만 빼서 멈춘 과제 목록에 다시 추가
                            remainingTasks.push(new Task(rem.name, t));
                            break;
                        }
                    }
                }
                // 1-2) 지금 과제 끝내면 새로운 과제 시작할 시간인 경우
                else if(curStart + curPlaytime == nextTask.start) {
                    answer.add(curName);
                    continue;
                }
                // 1-3) 새로운 과제 시작전까지 지금 과제를 못 끝내는 경우
                else {
                    int t = (nextTask.start - currentTime);
                    remainingTasks.push(new Task(curName, curPlaytime - t));
                }

            }

            // 2) 더 이상 남아있는 새로운 과제가 없는 경우
            else {
                // 2-1) 남아있는 과제(잠시 멈춘 과제)도 없는 경우
                if(remainingTasks.isEmpty()) {
                    currentTime += curPlaytime;
                    answer.add(curName);
                }
                // 2-2) 남아있는 과제는 있는 경우
                else {
                    answer.add(curName); // 새로운 과제부터 먼저 해결

                    // 남아있는 과제들을 정해진 순서대로 끝내면 됨
                    while(!remainingTasks.isEmpty()) {
                        Task rem = remainingTasks.pop();
                        answer.add(rem.name);
                    }
                }
            }
        }

        return answer;
    }
}
문제풀이
과제를 진행할 때
과제의 시작 시각(start)을 기준으로 하므로PriorityQueue를 사용해서 과제들의 정보를시작 시간순으로 저장합니다.그리고 멈춰둔 과제가 여러 개 있는 경우 가장 최근에 멈춘 과제부터 시작한다는 점에서 멈춘 과제들을 저장하기 위해
Stack을 사용했습니다.새로운 과제와 잠시 멈춘 과제를 고려해서 여러 경우의 수를 생각하고, 각각의 상황에 따라 적합한 코드를 작성하여 문제를 해결하는 것이였습니다.
Review
구현에 대해 설명은 자세하나 그 속은 복잡한 문제였다.
경우의 수가 많고, 그에 따라 문제를 푸는데 헷갈려서 아이패드를 이용했다.
해당 문제를 나중에 다시 복습하면서, 우선순위 큐와 스택을 활용하는 것에 익숙해지자.
- DevHistory 4
- Essay 1
- Java 10
- Spring 15
- SpringBoot 17
- JPA 13
- MySQL 3
- Flyway 1
- Kafka 8
- Technology 22
- GoodCode 7
- Side_Project 20
- Retrospective 4
- AlgorithmSkill 3
- LeetCode 2
- Algorithm 70
- SQL 9
- OS 14
- Database 8
- Network 7
- HTTP 7
- DataStructure 5
- Linux 4
- Woowacourse 4
- Git 9
- AssertJ 1
- IntelliJ 5
- Probability-Statistics 5
- Electronic-Finance 13
- Business-Statistics 13
- Competition 1
- Book 6
- Workout 7
- E.T.C 8