지금의 기록이 미래의 자산이 된다.
Today's records become tomorrow's assets.-
DNS
이 글의 정보들은 주로
컴퓨터 네트워킹 : 하향식 접근(7판)교재를 공부하면서 정리한 내용입니다.Host name 과 Domain name 차이
-
예를 들어
devfancy.github.io일때devfancy가 호스트 네임,github.io이 도메인 네임이다. -
호스트 네임과 도메인 네임을 합치면
FQDN(Fully Qualified Domain Name)이 된다. -
즉, DNS 서버의 이름 = host name + domain name 이다.
-
비유하자면 호스트는 내선번호이고, 도메인은 회사/집의 전화번호이다.
DNS
-
사람은
www.apple.com과 같은 호스트 이름을 통해 온라인으로 정보에 접근한다. -
웹브라우저는 인터넷프로토콜(IP) 주소를 통해 상호작용한다.
-
사람은 좀 더 기억하기 쉬운 호스트 이름 식별자를 좋아하지만, 라우터는 고정 길이의 계층구조를 가진 IP 주소를 좋아한다. 이러한 선호 차이를 절충하기 위해 호스트 이름을 IP 주소로 변환해주는 디렉터리 서비스가 DNS(domain name system)의 주요 임무다.
-
DNS는 브라우저가 인터넷 자원을 로드할 수 있도록 호스트 이름과 IP 주소를 매핑해주는 서버로서, 호스트 이름과 IP 주소를 저장하고 있는 분산 데이터베이스다.-
예)
www.naver.com의 IP 주소가 222.111.222.111로 되어있는데 사용자가 보기 쉽게 호스트 이름으로 매핑해준다. -
쉽게 말하면 웹 사이트를 위한 주소록이라고 생각하면 된다.
-
-
DNS 는
애플리케이션 계층에 속한다. (예플리케이션 계층 - FTP, HTTP, SSH, SMTP, DNS)-
애플리케이션 계층은 웹 서비스, 이메일 등 서비스를 실질적으로 사람들에게 제공하는 층이다. -
그 중 DNS는 TCP/IP 환경에서 IP 주소로 시스템을 구분한다.
-
분산 계층 데이터베이스
-
단일 DNS 서버에 있는 중앙 집중 데이터베이스는 서버의 고장, 트래픽양, 먼 거리의 중앙 집중 데이터베이스, 유지관리 등의 문제쟘을 이유로 확장성이 전혀 없다.
-
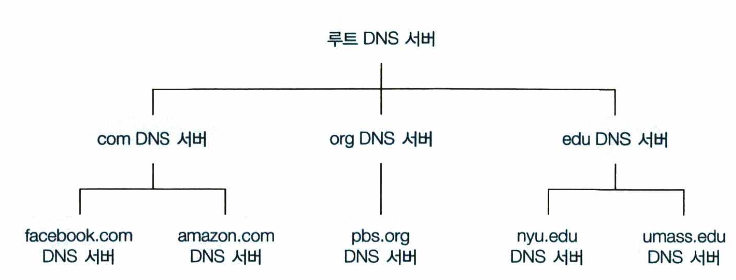
이러한 확장성 문제를 다루기 위해 DNS는 많은 서버를 이용하여 계층 형태로 분산시킨다.
-
루트 DNS 서버: 1000개 이상의 루트 서버 인스턴스가 전세계에 흩어져 있다. 루트 네임 서버는 TLD 서버의 IP 주소들을 제공한다. -
최상위 레벨 도메인(TLD) 서버: com, org, net, edu, gov 같은 상위 레벨 도메인과 kr, ur, fr, ca, jp 같은 모든 국가의 상위 레벨 도메인에 대한 TLD 서버가 있다. TLD 서버는 책임 DNS 서버에 대한 IP 주소를 제공한다. -
책임 DNS 서버: 인터넷에 접근하기 쉬운 호스트를 가진 모든 기관은 호스트 이름을 IP 주소로 매핑하는 공개적인 DNS 레코드를 제공해야 한다. 대부분의 대학과 큰 기업들은 자신의 기본 책임 DNS 서버와 보조 책임 DNS 서버를 유지하고 구현한다.
DNS query
- ISP(Internet Service Provider)의
DNS 서버(DNS recursor)가 호스팅하고 있는 서버의 IP 주소를 찾기 위해 DNS query를 날린다.
DNS query의 목적
-
DNS 서버들을 검색해서 해당 사이트의 IP 주소를 찾는데에 있다.
-
IP 주소를 찾을 때까지 DNS 서버에서 다른 DNS 서버를 오가며 에러가 날 때까지 반복적으로 검색한다.
DNS query 기본 동작

-
www.google.com주소를 검색할 때,-
[1] DNS 서버가 루트 DNS 서버에 요청한다.
-
[2] .com 도메인 TLD 서버로 리다이랙트 한다.
-
[3] google.com 책임 DNS 서버로 리다이랙트 한다.
-
[4] 최종적으로 DNS 기록에서
www.google.com에 매칭되는 IP 주소를 찾는다. -
[5] 찾은 IP 주소를 DNS 서버로 보낸다.
-
-
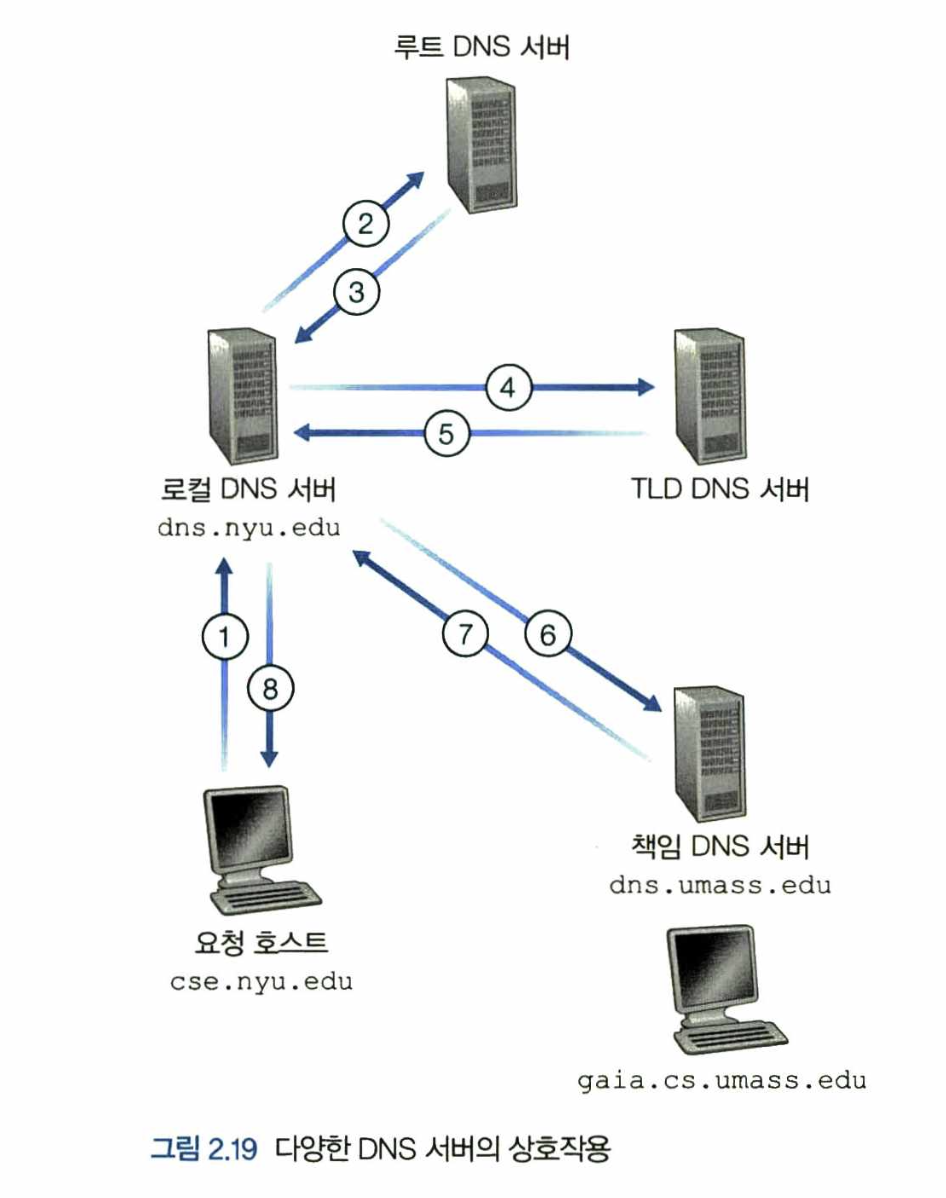
DNS query 종류에는 Recursive Query, Iterative Query가 있다.
-
그림 2.19의 예는 재귀적 질의와 반복적 질의를 사용한다.
cse.nyu.edu로부터dns.nyu.edu로 보내는 질의는 자신을 대신하여 필요한 매핑을 얻도록dns.nyu.edu에게 요구하므로 재귀적 질의이다. -
그러나 다른 세 가지 질의는 모든 응답이
dns.nyu.edu에 직접 보내지므로 반복적 질의다. -
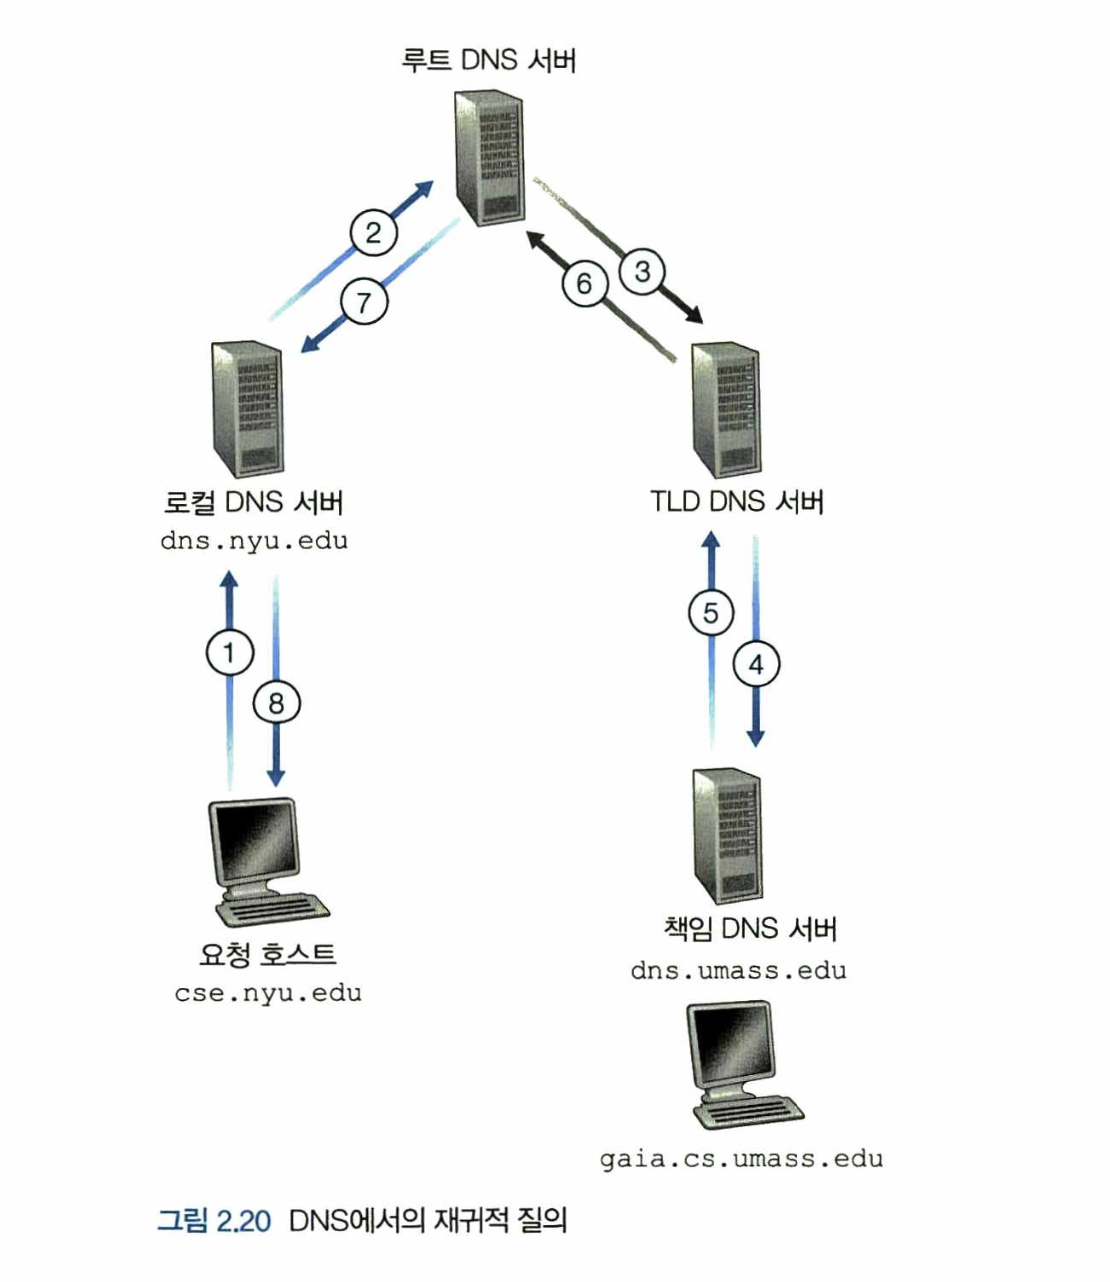
이론상, DNS 질의는 반복적이고 재귀적일 수 있다.
-
그림 2.20의 예에서 모든 질의가 재귀적인 DNS 질의 사슬을 따른다.
-
일반 질의는 전형적으로 그림 2.19의 형식을 따른다.
-
요청하는 호스트로부터 로컬 DNS 서버까지의 질의는
Recursive Query(재귀적인 질의)이고, 나머지는Iterative Query(반복적인 질의)이다. -
요청한 호스트에게 매핑 결과를 전달하기 위해 실제로 많은 DNS query 메세지가 필요하다.
-
그러한 DNS query 전송을 줄이기 위해
DNS 캐싱방법을 사용한다.
DNS 캐싱
-
실제 DNS는 지연 성능 향상과 네트워크의 DNS 메세지 수를 줄이기 위해
캐싱을 사용한다. -
DNS 캐싱의 아이디어는 질의 사슬에서 DNS 서버가 DNS 응답을 받았을 때(호스트 이름을 IP 주소로 매핑하기) 그것은 로컬 메모리에 응답에 대한 정보를 저장할 수 있다.
-
호스트 이름과 IP 주소 쌍이 DNS 서버에 저장되면 처음 브라우저가 캐싱된 DNS를 확인하고 캐싱된 기록이 없을 때 DNS 질의로 넘어간다.
-
호스트 이름과 IP 주소 사이 매핑과 호스트는 영구적이지 않기 때문에 특정 기간마다 저장된 정보를 제거한다.
-
-
OSI 7 Layers
이 글의 코드와 정보들은 대학 수업
컴퓨터망프로그래밍과목을 공부하면서 정리한 내용입니다.OSI 7 Layers
-
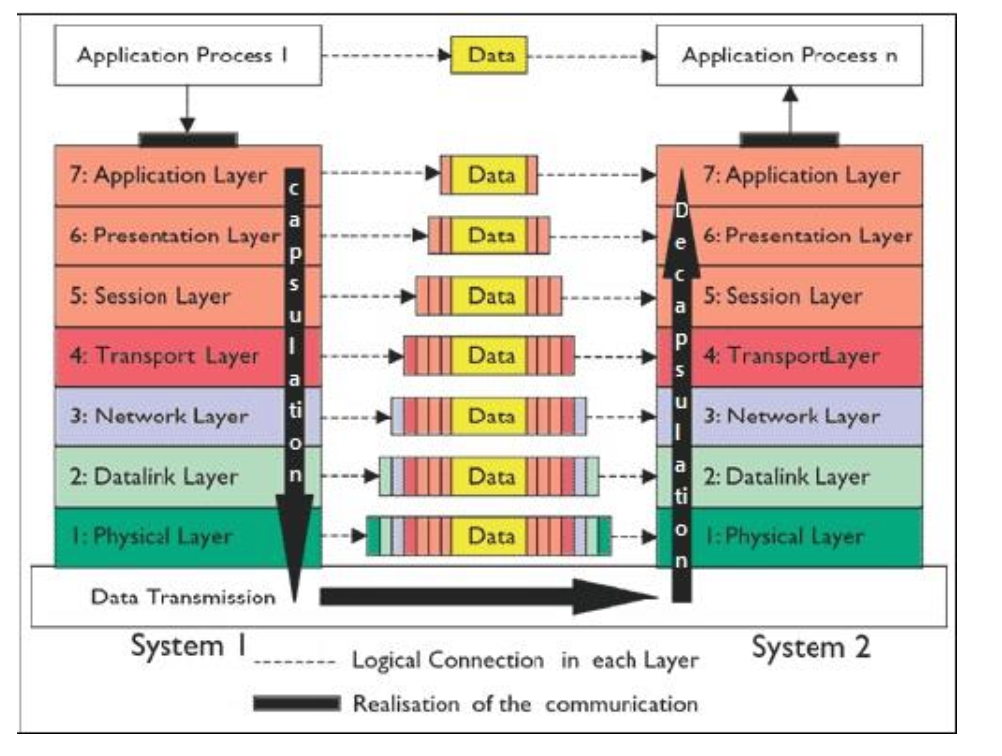
국제표준화기구(ISO)에서 개발한 모델이다.
-
컴퓨터 네트워크 프로토콜 디자인과 통신을 7계층으로 나누어 설명한다.
-
각 계층은 하위 계층의 기능만을 이용, 상위 계층에게 기능을 제공한다.
-
-
레퍼런스 모델
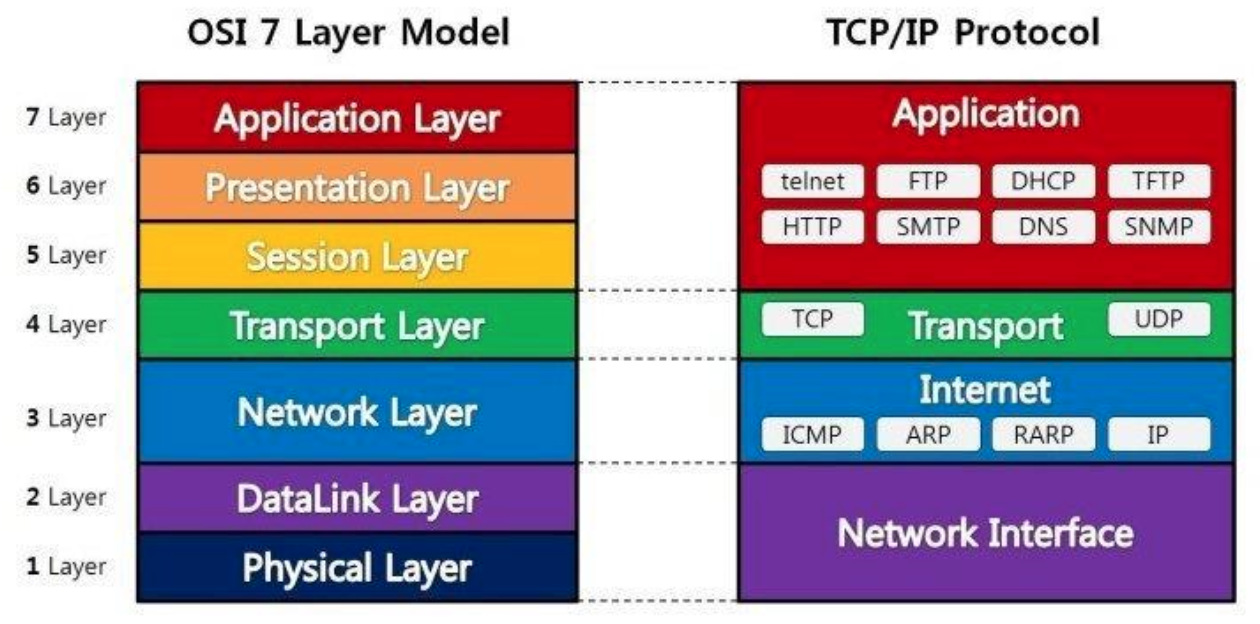
1계층 : Physical Layer
-
역할
-
전기적, 기계적 특성을 이용해서 통신 케이블로 데이터를 전송한다.
-
통신 단위는 비트(0, 1)
-
데이터를 전달하는 기능이다.(어떤 데이터인지는 관여하지 않는다)
-
-
장비 - 통신 케이블, 리피터, 허브 등

-
-
나만의 GitHub README.md 꾸미기
Prologue
-
누군가가 나의 GitHub 주소를 방문할 때
내가 어떤 분야에 공부하고 있고, 어떤 기술을 가졌는지
보다 쉬운 이해를 위해서 (+나의 프로필을 꾸미고 싶어서) 만들게 되었다.
(현재) 결과물 : 나의 GitHub README.md(2023.02.06)
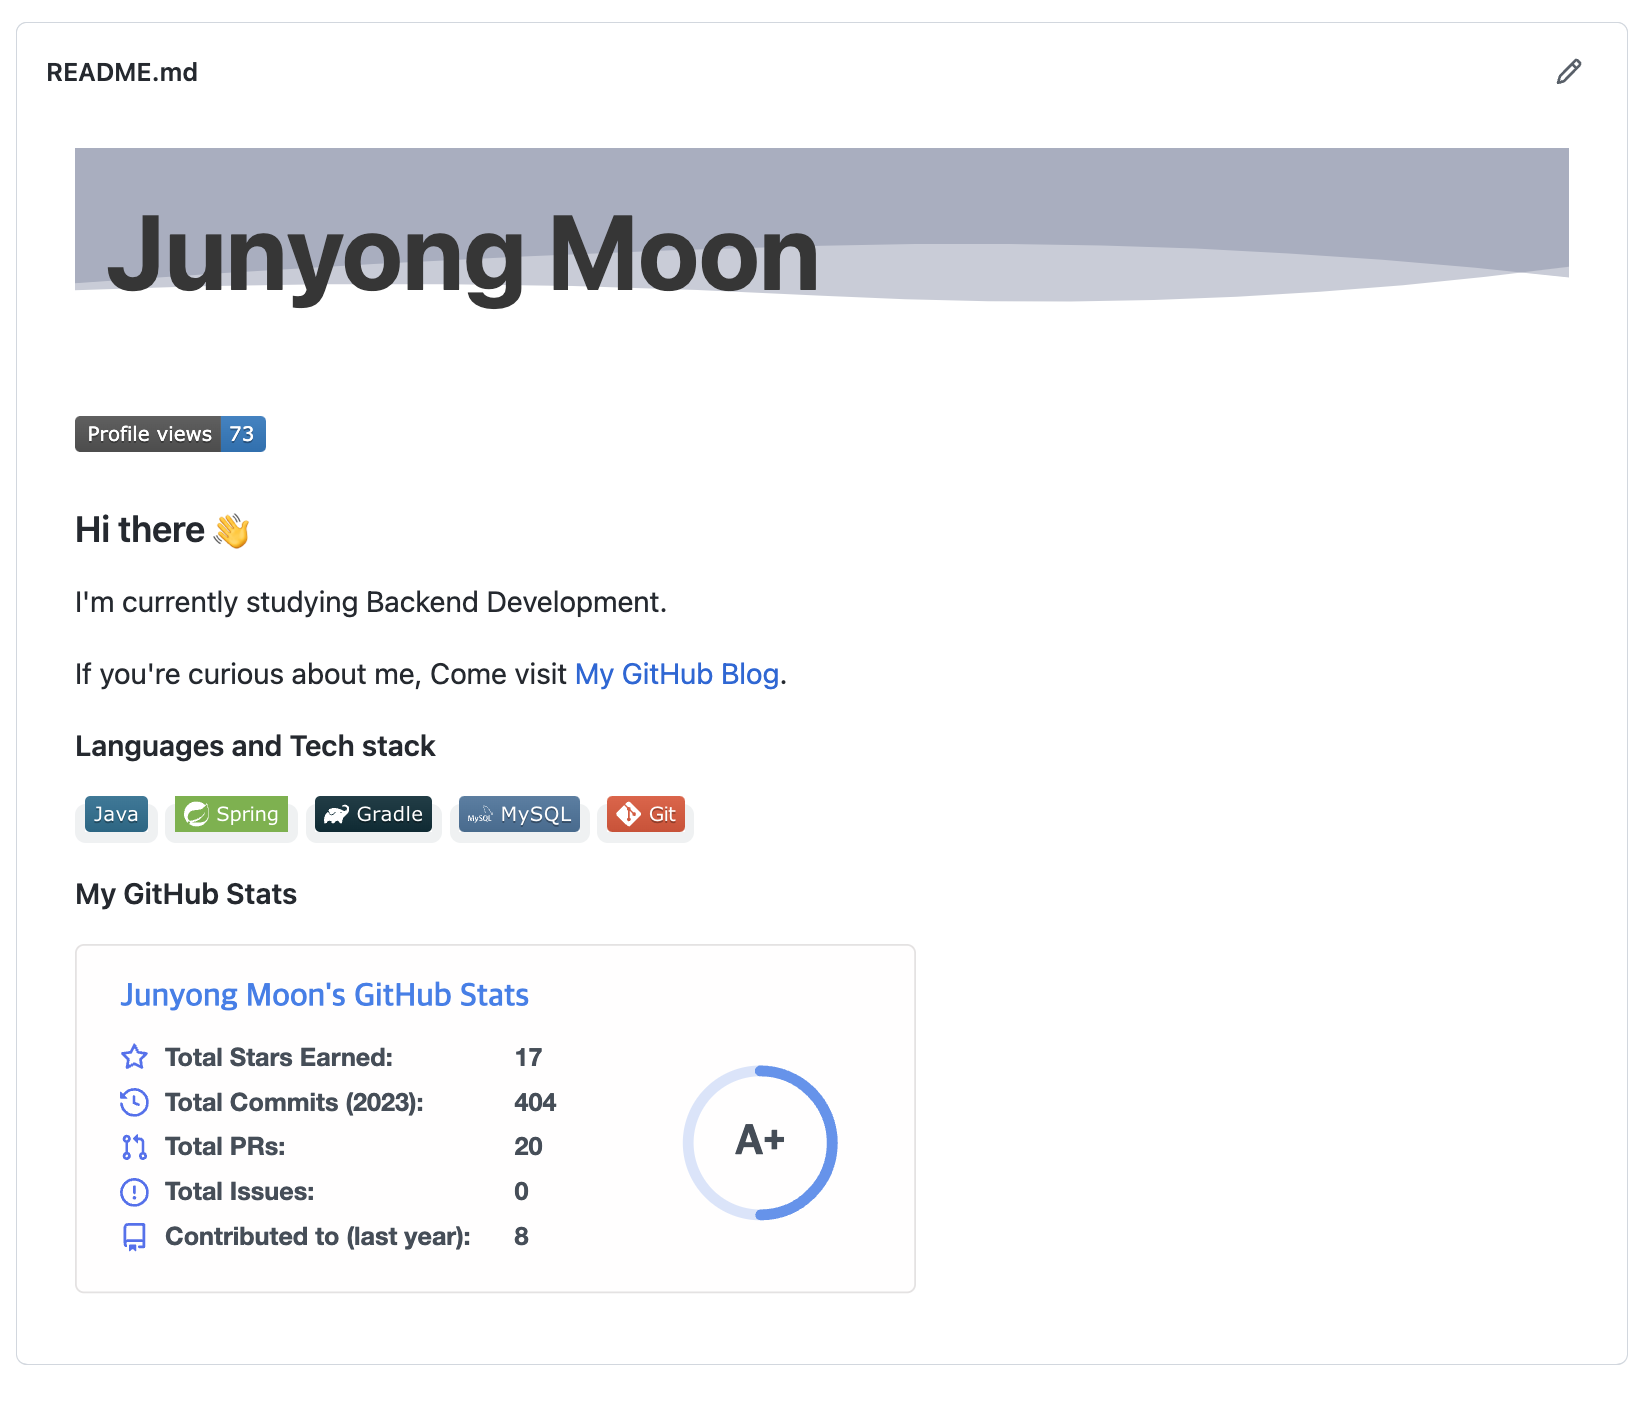
README repo 생성
-
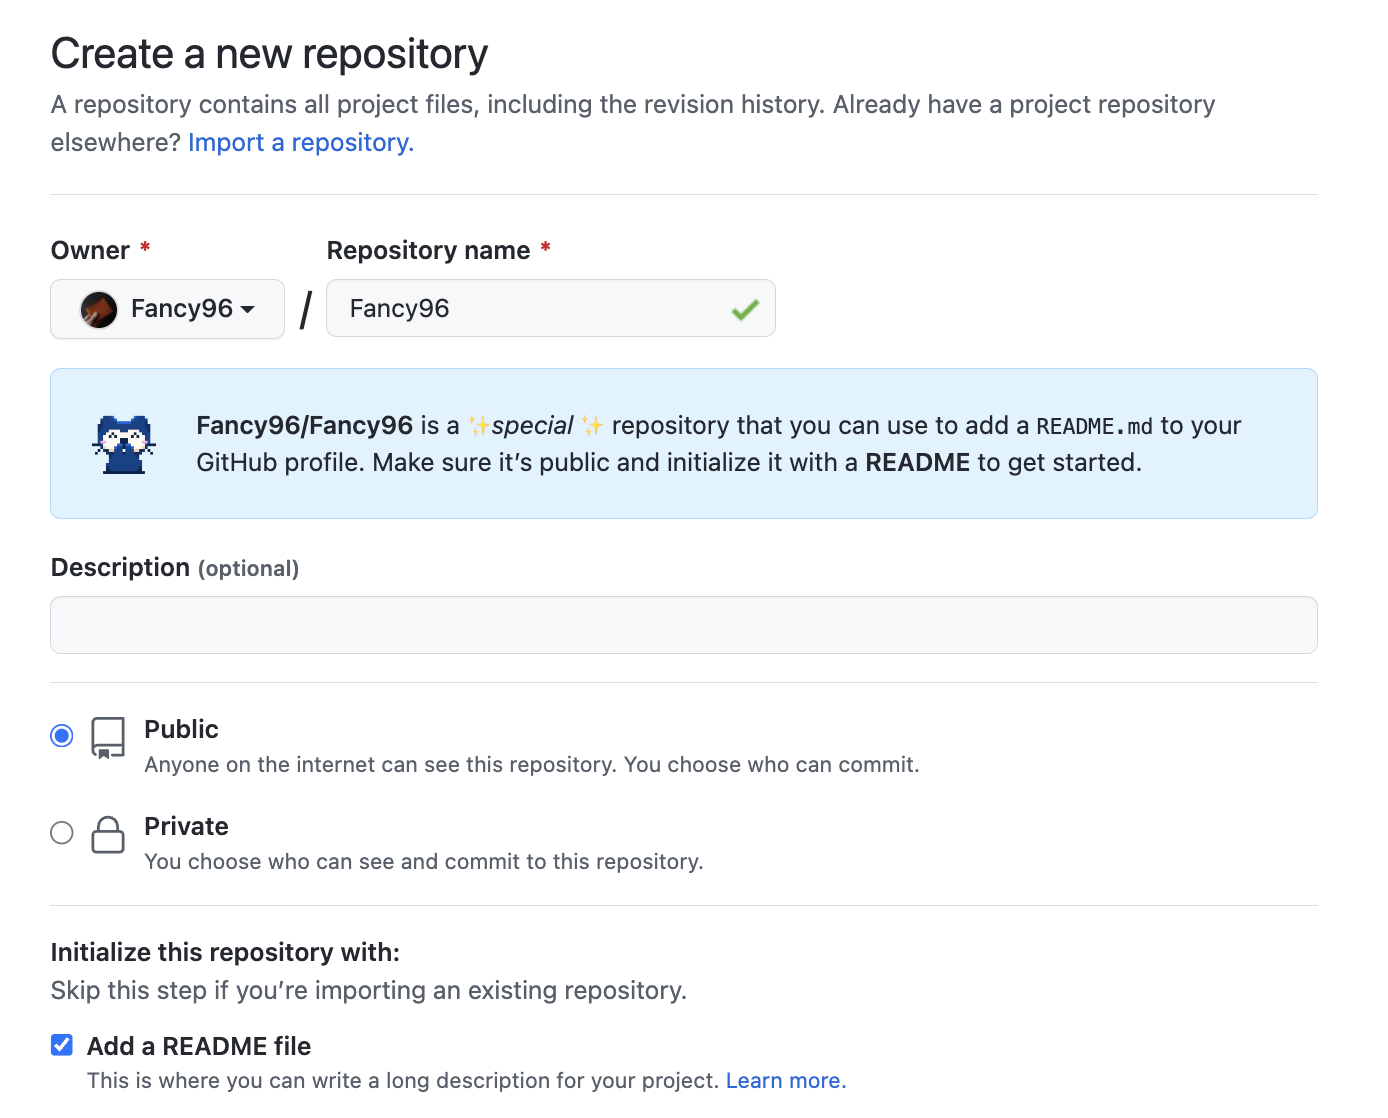
repository name을 github user name(본인의 계정 이름)으로 입력하면,
specialrepository를 확인할 수 있다. -
Github 접속 ->
Repository->New클릭한 후Repository name밑에 본인의 계정 이름을 입력하면 된다. -
그 밑에
Public부분과Add a README file클릭하고 확인 버튼을 누른다. (README.md 파일은 직접 만들어도 된다)
-
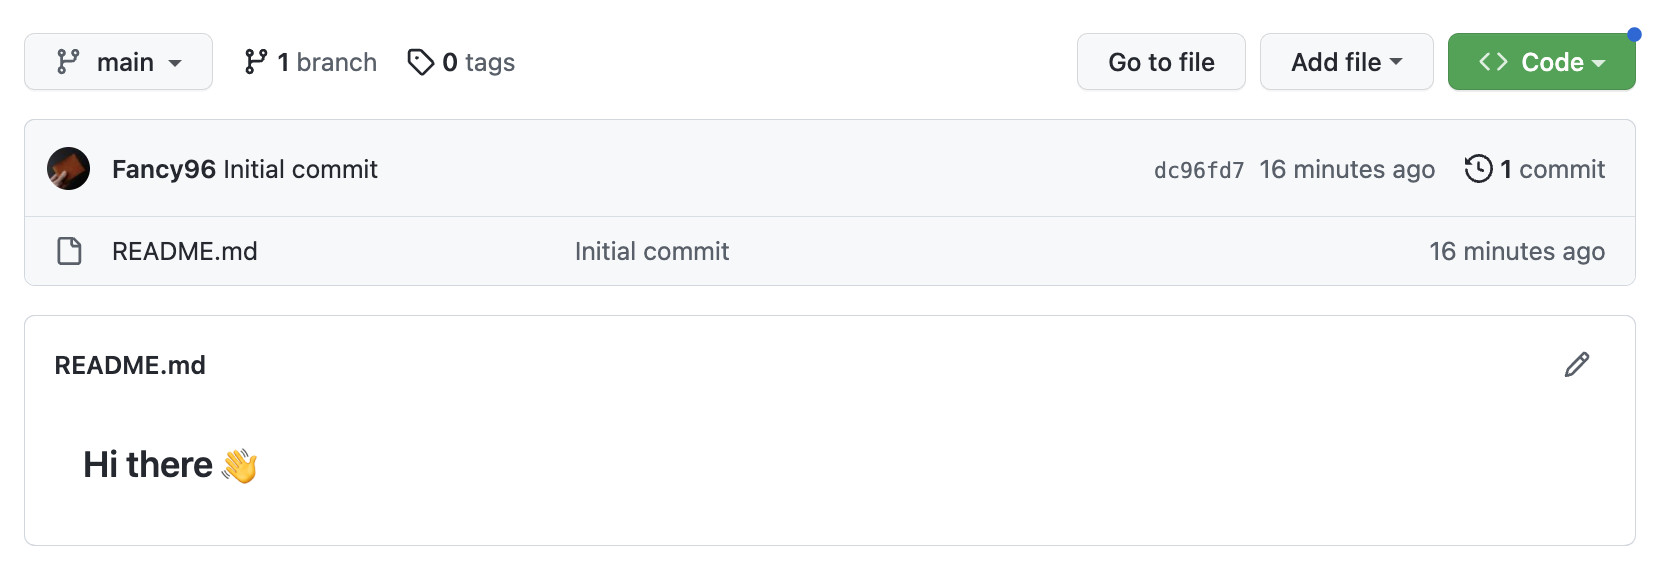
확인 버튼을 클릭하게 되면 다음과 같이 새로운 repository가 생성되고 README.md 파일에 Hi there 👋이 보인다.
-
이제 이
README.md파일에서 본인이 원하는 대로 수정해서 프로필 영역을 만들어 나가면 된다.
README Header

-
Readme Header : capsule-render에 가서
Markdown아래에 있는 코드를 복사한다. -
복사한 코드 :
 -
해당 코드를 본인의
README.md파일에 붙여넣기를 하는데,text=뒤에 하고 싶은 이름 혹은 제목을 써주면 된다. -
그 밖에 본인에게 맞는
type,color,height,fontSize,fontAlign등등 값을 지정해주면 된다.
-
-
[Programmers] 42747. H-Index
성능 요약
메모리: 76 MB, 시간: 0.36 ms
구분
코딩테스트 연습 > 정렬
Answer Code1(2023.02.06)
import java.util.*;

class Solution {
    public int solution(int[] citations) {
        int answer = 0;
        int h = 0;
        int max = 0;

        //1.
        Arrays.sort(citations);

        //2.
        for(int i = 0; i < citations.length; i++) {

            //2-1
            int smaller = Math.min(citations[i], citations.length-i);

            //2-2
            if(smaller >= answer) {
                answer = Math.max(answer, smaller);
            }
            else {
                break;
            }
        }

        //3.
        return answer;
    }
}
문제 풀이
-
전체 논문의 인용횟수를 값으로 가진 배열에서 전체 n편 중 h편의 논문이 h회 이상 인용되었을 때
h의 최대값인 H-Index을 구하는 문제다.
-
논문 수의 n과 H-Index가 될 수 있는 h의 관계는
h <= n으로 표현할 수 있다.
-
인용횟수 배열을 정렬한다.
-
인용횟수 배열 요소 값을 차례로 h로 지정하며 H-Index 조건에 부합하는지 확인한다.
-
h의 최대값을 구하기 때문에
h는 논문의 최대 수인 n부터 -1씩 감소하는 것으로 시작한다(citations.length-i) -
[2-1]조건:
현재(해당 요소) 논문의 인용횟수(citations[i])>=h회 이상 인용된 논문 개수(citations.length-i) -
현재 논문의 인용횟수와현재 논문보다 인용횟수가 크거나 같은 논문의 개수두 값 중 작은 값이 H-Index로 지정되어야 -
“전체 n편 중 h편의 논문이 h회 이상 인용”이라는 말이 무조건 참이 되므로
-
[2-2]두 값 중 최소값을 갖는 임시 H-Index 값을 지정하고, 오름차순으로 정렬된 요소들에 차례대로 접근하여 최대값을 갱신해 나간다.
-
더 이상 값이 증가하지 않고, 감소되는 구간에서는 반복을 중지한다(최대값을 구하기 때문)
-
-
조건에 부합하는 h의 값들 중 최대값인
H-Index를 출력한다.
Review
-
처음에는 제대로 이해가 되질 않아서 바로 그림을 그려나가니까, 이해가 되었다.
-
2번 조건에 부합하는 것을 코드로 옮기는 작업이 오래 걸렸지만, 이해와 또 다른 알고리즘을 알게 되어서 좋았다.
-
문제에 대한 이해와 어떻게 풀어야하는 지 알기 시작한 이후부터는 최대한 메모리와 시간을 최소화하기 위해 효율적으로 구현하려고 노력했다.
-
-
[Programmers] 12980. 점프와 순간 이동
성능 요약
- 메모리: 52.1 MB, 시간: 0.02 ms
구분
- 코딩테스트 연습 > Summer/Winter Coding(~2018)
Answer Code1(2023.02.06)
import java.util.*;

public class Solution {
    public int solution(int n) {
        int ans = 0;

        while(n != 0) {
            if(n % 2 == 0) {
                n /= 2;
            } else {
                n -= 1;
                ans++;
            }
        }

        return ans;
    }
}
문제 풀이
-
이동하는 방법1,2 : [1] 한 번에 K칸을 앞으로 점프하는 방법 / [2] (현재까지 온 거리) X 2에 해당하는 위치로 순간이동하는 방법
점프는 건전지 사용량이 들고,순간이동은 건전지 사용량이 줄지 않는다.
-
건전지 사용량의 최솟값을 만들기 위해서는 최대한 아이언 슈트를 착용하고
순간이동을 하는 방법을 활용하고, 필요할 때에만점프방법을 사용한다.
-
[결론]
-
N이 0이 될 때까지
-
N이 짝수라면 반을 나누고 N / 2 (순간이동)
-
N이 홀수라면 -1을 빼며 점프하여 최솟값을 구한다.
-
Review
-
N이 6일 때 6까지 최대한
순간이동방법을 써서 건전지의 사용량의 최솟값을 구하면 되는 문제였다. -
아이디어는 6부터 시작해서 0까지 가는 Top-Down 방식으로 사용하면 간단하게 풀 수 있는 문제였는데,
아이디어가 바로 떠오르지 않아서 고민한 시간이 꽤 길었다. (20~30분)
-
머리로 떠오르지 않으면 그림을 그려보자!
- DevHistory 4
- Essay 1
- Java 10
- Spring 15
- SpringBoot 17
- JPA 13
- MySQL 3
- Flyway 1
- Kafka 8
- Technology 22
- GoodCode 7
- Side_Project 20
- Retrospective 4
- AlgorithmSkill 3
- LeetCode 2
- Algorithm 70
- SQL 9
- OS 14
- Database 8
- Network 7
- HTTP 7
- DataStructure 5
- Linux 4
- Woowacourse 4
- Git 9
- AssertJ 1
- IntelliJ 5
- Probability-Statistics 5
- Electronic-Finance 13
- Business-Statistics 13
- Competition 1
- Book 6
- Workout 7
- E.T.C 8