지금의 기록이 미래의 자산이 된다.
Today's records become tomorrow's assets.-
[리뷰] 소프트웨어 장인 리뷰
Prologue

-
우아한테크코스의 캡틴으로 불리는
박재성님이 0순위로 추천한 책이다. -
책을 읽고 난 소감은 개발과 관련해서 더 나은 개발자가 되기 위한
마인드위주의 책이었다. -
이 책은 개인적인 일화와 현장 경험에서 비롯된 무게감 있는 조건이 가득했다.
-
자신의 일에 자부심을 갖는 프로페셔널로 도약하기 위해 필요한 계획, 전략, 태도, 원칙 등을 여러 가지 관점에서 조언했다.
-
책을 읽으면서 내가 생각한 중요한 부분이나 기억해야 할 부분들을 정리해봤다.
Part1.이념과 태도
21세기 소프트웨어 개발
-
개발자라면 다음과 같은 여러가지를 할 수 있어야 한다.
-
고객과 대화하기
-
테스트/배포 자동화하기
-
전체 비즈니스에 영향을 미칠 기술 선정하기
-
지리적으로 분산된 팀들과 협업하기
-
고객을 도와 필요한 작업을 정의하기
-
우선순위 선정하기
-
진척 상황 보고하기
-
변경사항과 기대일정 관리하기
-
잠재 고객 및 파트너에게 제품 소개하기
-
사전 영업 활동 지원하기
-
개발 일정과 비용 산출하기
-
채용 면접하기
-
아키텍쳐 설계하기
-
비기능적 요구사항과 계약조건(SLAS) 검토하기
-
사업 목표 이해하기
-
주어진 여건에서 최적의 결정하기
-
새로운 기술 주시하기
-
더 나은 업무 방식 찾기
-
고객에게 가치 있는 상품이 전달되고 있는지 고민하기
-
-
어떤 사람들은
훌륭한 개발자라면 위의 일들을 이미 해왔을 거라고 한다.
애자일
-
애자일은 서로 다른 여러 맥락에서 따른 방법론과 테크닉의 조합이다. -
애자일 원칙의
절차적인 부분들은 팀과 조직이 어떻게 구성되고 협업해야 하는지에 대한 것들을 규정한다.-
회의 방식, 구성원 각각의 역할, 요구사항 파악 방법, 작업 진척 속도 파악 방법, 점진적/반복적으로 일할 때 취하는 방식 등과 같은 것들이다.
-
팀에 정말로 중요한 것, 비즈니스 가치가 있는 것에 집중한다.
-
-
애자일 원칙의
기술적인 부분들은 개발, 확장, 유지보수, 제품을 출하면서 어려움들에 대해 특정한 기술적 관례나 기술 자체를 매우 구체적으로 가이드한다.- 테스트 주도 개발(TDD), 페어 프로그래밍, 지속적인 통합, 단순한 디자인 원칙 등과 같은 것들이다.
-
-
GitHub에 올라간 Branch에 Protection Rule 적용하기
- Prologue
- Branch protection rule
- Branch name pattern
- Protect matching branches
- Require status checks to pass before merging
- Rules applied to everyone including administrators
- Reference
Prologue

-
CS 스터디를 진행하면서 저장소를 관리하기 위해 커밋 메시지 Rule을 정했지만, Branch에 대한 Rule을 정하진 않았다.
-
Git의 Branch는 협업을 위한 기본 토대이기 때문에 최소한의 Rule이 있어야 협업 시의 혼란을 방지할 수 있다.
Branch protection rule
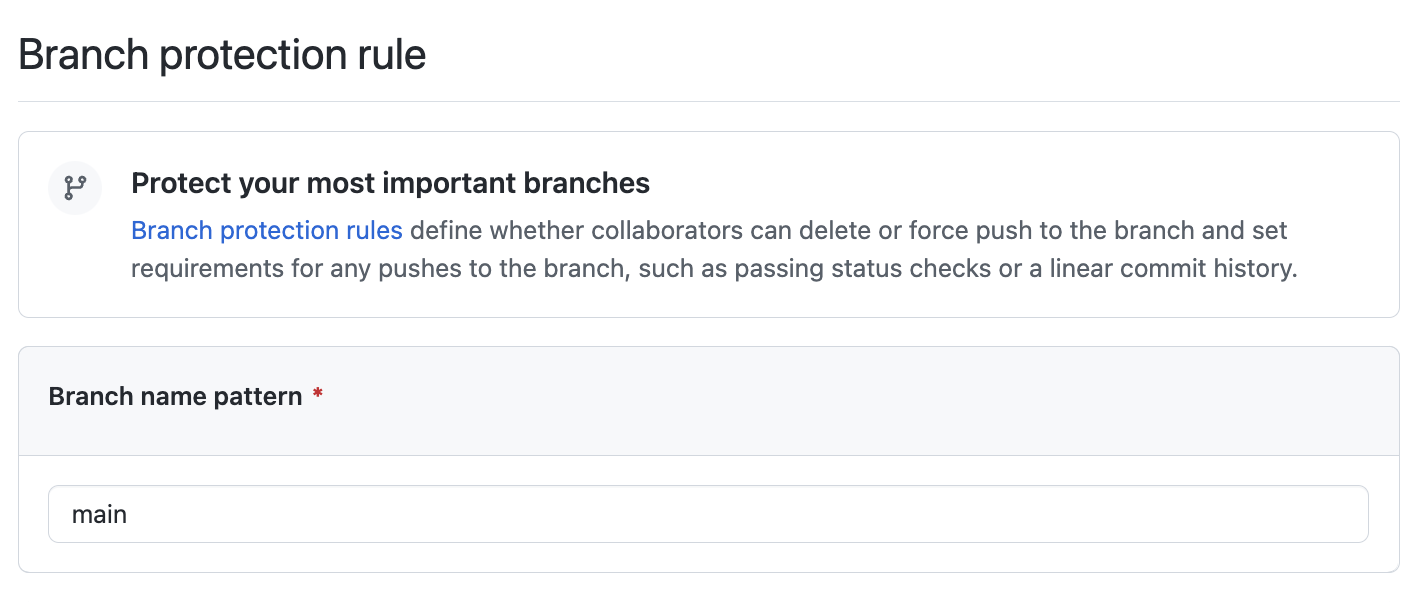
-
GitHub에서 GitHub에 올라간 Branch들에 대해 Rule을 지정할 수 있게 도와준다.
-
이 Rule을 적용하면 특정 Branch를 실수로 지우거나 Branch에 강제로 푸시할 수 있는 지에 대한 여부를 정의할 수 있다.
-
그리고 Merge하기 전에, 상태를 확인하거나 선형 커밋 기록과 같은 것들을 Branch에 푸시하는 것에 대한 요구 사항을 설정할 수 있다.
Branch name pattern
-
Branch Protection Rule이 적용되도록 Branch 이름을 적어둔다.
-
기본적으로 main(또는 master)를 적어둔다.
Protect matching branches
- 다음으로 Protection Rule이 적용될 Branch의 패턴을 만들고, 해당 Branch에 대해 8가지 Rule을 설정한다.
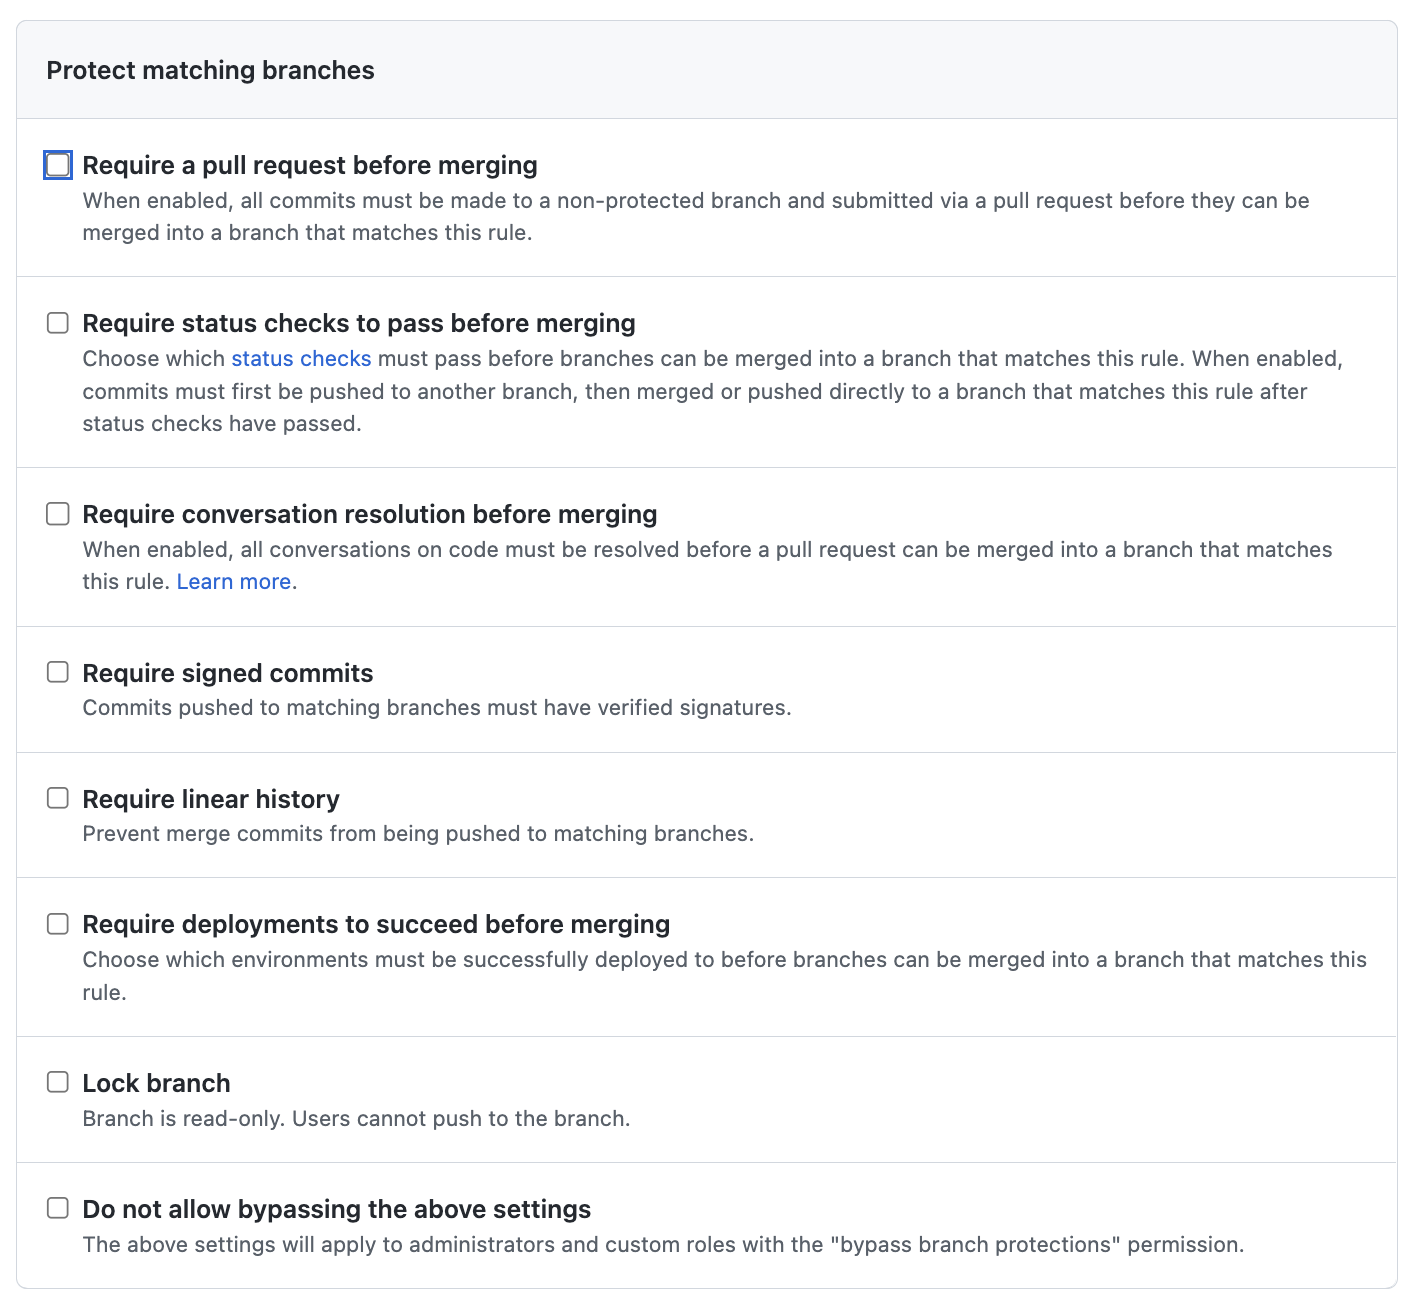
Require a pull request before merging
-
8가지 Rule 중에 가장 많이 쓰이는 Rule 이다.
-
모든 Commit들은 별도의 Branch를 만들어서 Merge 하기 전에 PR(pull request)을 보내야 하는 Rule이다.
-
즉, 로컬에서 Direct Push가 안되고, Push를 하려면 별도의 Branch를 만들어야 한다.
-
협업 시 Branch를 로컬로부터 Direct Push를 막아주고 코드리뷰를 통해 Merge 할 수 있다.
Require approvals
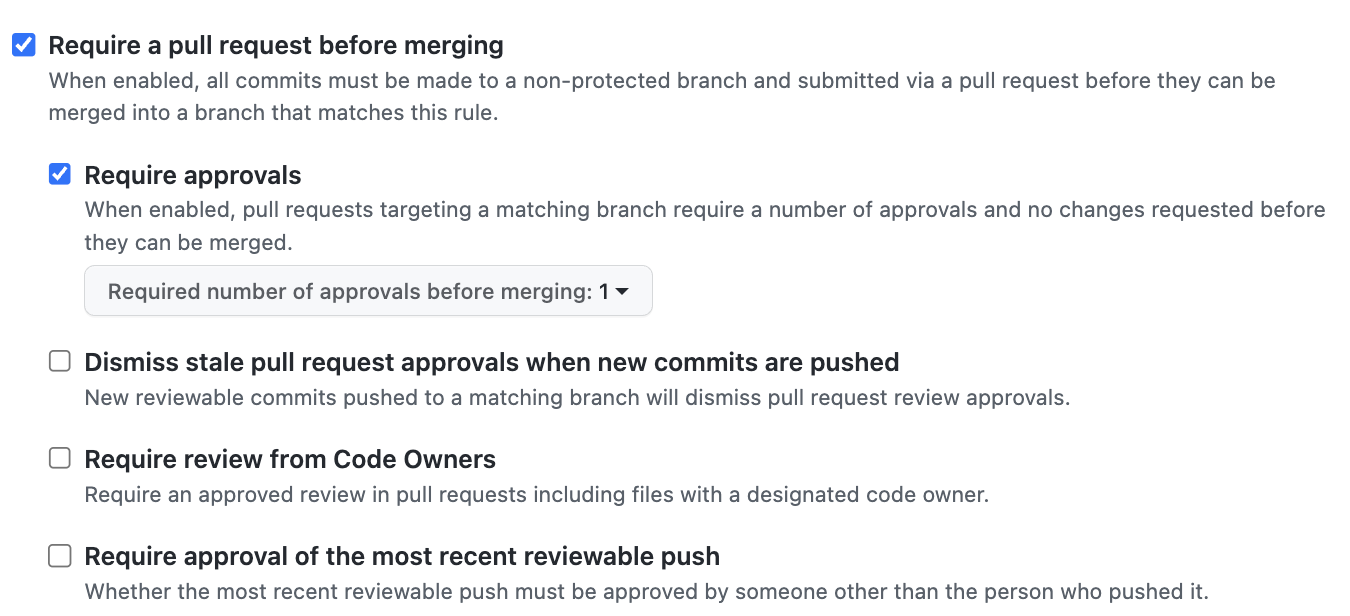
-
개인이 PR를 보내고 Merge를 하기 전에 승인해주는 인원을 정하는 의미다.
-
예)
Required number of approbals before merging : 1은 1명만 승인해주면 된다는 의미다. -
그 밖에 다양한 설정들이 있다.
Require status checks to pass before merging
-
8가지 Rule 중에 두번째로 많이 쓰이는 Rule이다.
-
테스트에 통과하게 되면 Merge를 할 수 있다는 Rule이다.
- 그 외 나머지는 설명만 보면 이해가 돼서 Pass 하겠다.
Rules applied to everyone including administrators

- 이 두 가지는 특별한 일이 아니면 사용하지 않는 게 좋다.
Reference
-
[Programmers] 12981. 영어 끝말잇기
성능 요약
- 메모리: 67.9 MB, 시간: 0.07 ms
구분
-
코딩테스트 연습 > Summer/Winter Coding(~2018)
-
구현(시뮬레이션)
Answer Code1(2023.02.05)
import java.util.*;

class Solution {
    public int[] solution(int n, String[] words) {
        int[] answer = {0,0};

        // 사용 단어 저장
        HashSet<String> set=new HashSet<>();

        // 첫 번째 단어의 마지막 문자 저장
        char prev=words[0].charAt(words[0].length()-1);

        // 첫 번째 단어 저장
        set.add(words[0]);

        // 2번째 단어부터 탐색
        for(int i = 1 ; i < words.length; i++){

            // 앞 단어의 마지막 문자로 시작하지 않거나 이미 말한 단어라면 종료
            if(prev != words[i].charAt(0) || set.contains(words[i])){
                //  탈락자 번호
                answer[0]= i % n + 1;

                // 몇 번째 차례에서 탈락했는지에 대한 갯수
                answer[1]= i / n + 1;
                break;
            }
            // 아니라면, 다음 체크를 위해 prev, set 설정
            prev = words[i].charAt(words[i].length()-1);
            set.add(words[i]);
        }
        return answer;
    }
}
문제 풀이
-
단어의 중복 체크는 HashSet을 이용한다.
- 올바른 단어이면
set에 넣어 저장한다.
- 올바른 단어이면
-
앞 단어와 끝말잇기 조건에 맞는지 확인한다.
-
char prev를 두어 앞 단어의 마지막 문자를 저장한다.
-
일단 0번째 시작 단어는 앞문자가 없으므로 바로 prev와 set에 넣는다.
-
1번째부터 앞 문자와 체크한다. 앞 단어의 끝 문자 prev와 나(i)의 시작 단어가 다르거나 set에 있는 단어라면 answer에 값 넣고 종료한다.
-
-
21. Swapping: Mechanisms
이 글의 사진과 내용은 공룡책 과 컴퓨터학부 수업인 운영체제 강의자료를 기반으로 작성했습니다.
Prologue
-
[1] 모든 Page가 Physical memory에 매핑된다.
- 하지만, 지역성(locality)으로 한 번에 사용되는 page 수가 많지 않기 때문에, 메모리가 낭비되는 문제점이 있다.
-
[2] Physical memory의 크기는 제한적이다.
- 그렇기 때문에 현재 사용하는 page만 매핑하는 것이 더 효율적일 것이다.
-
Key idea: 현재 사용하지 않는 page들을 Disk에 저장하는 것이다.
What is Swap Space
-
Swap Space이란 Physical memory에서 매핑되지 않는 page들을 위한 Disk 공간이다. -
Swap Space에서는 두 가지 작업이 제공된다.
-
Swap out이란 pages을 Physical memory에서 Swap space로 이동하는 것이다. -
Swqp in이란 pages을 Swap space에서 Physical memory로 이동하는 것이다.
-
-
-
20. Paging: Smaller Table
이 글의 사진과 내용은 공룡책 과 컴퓨터학부 수업인 운영체제 강의자료를 기반으로 작성했습니다.
Prologue
-
TLB가 관리할 수 있는 page보다 더 많은 page를 요구하는 프로세스를 처리하는 경우
Page table에 사용되는 메모리 공간을 줄이는 방법에 대해서 알아보자.
Paging: Linear Tables
-
Linear (Page) Tables(선형 페이지 테이블) : 일반적으로 시스템에서 모든 process에 대해 하나의 page table을 가진다. -
예) 4KB(2^12) 크기의
Page와 4-byte 크기의Page table entry를 가지는 32-bit 크기의가상 주소(address space)가 있다.
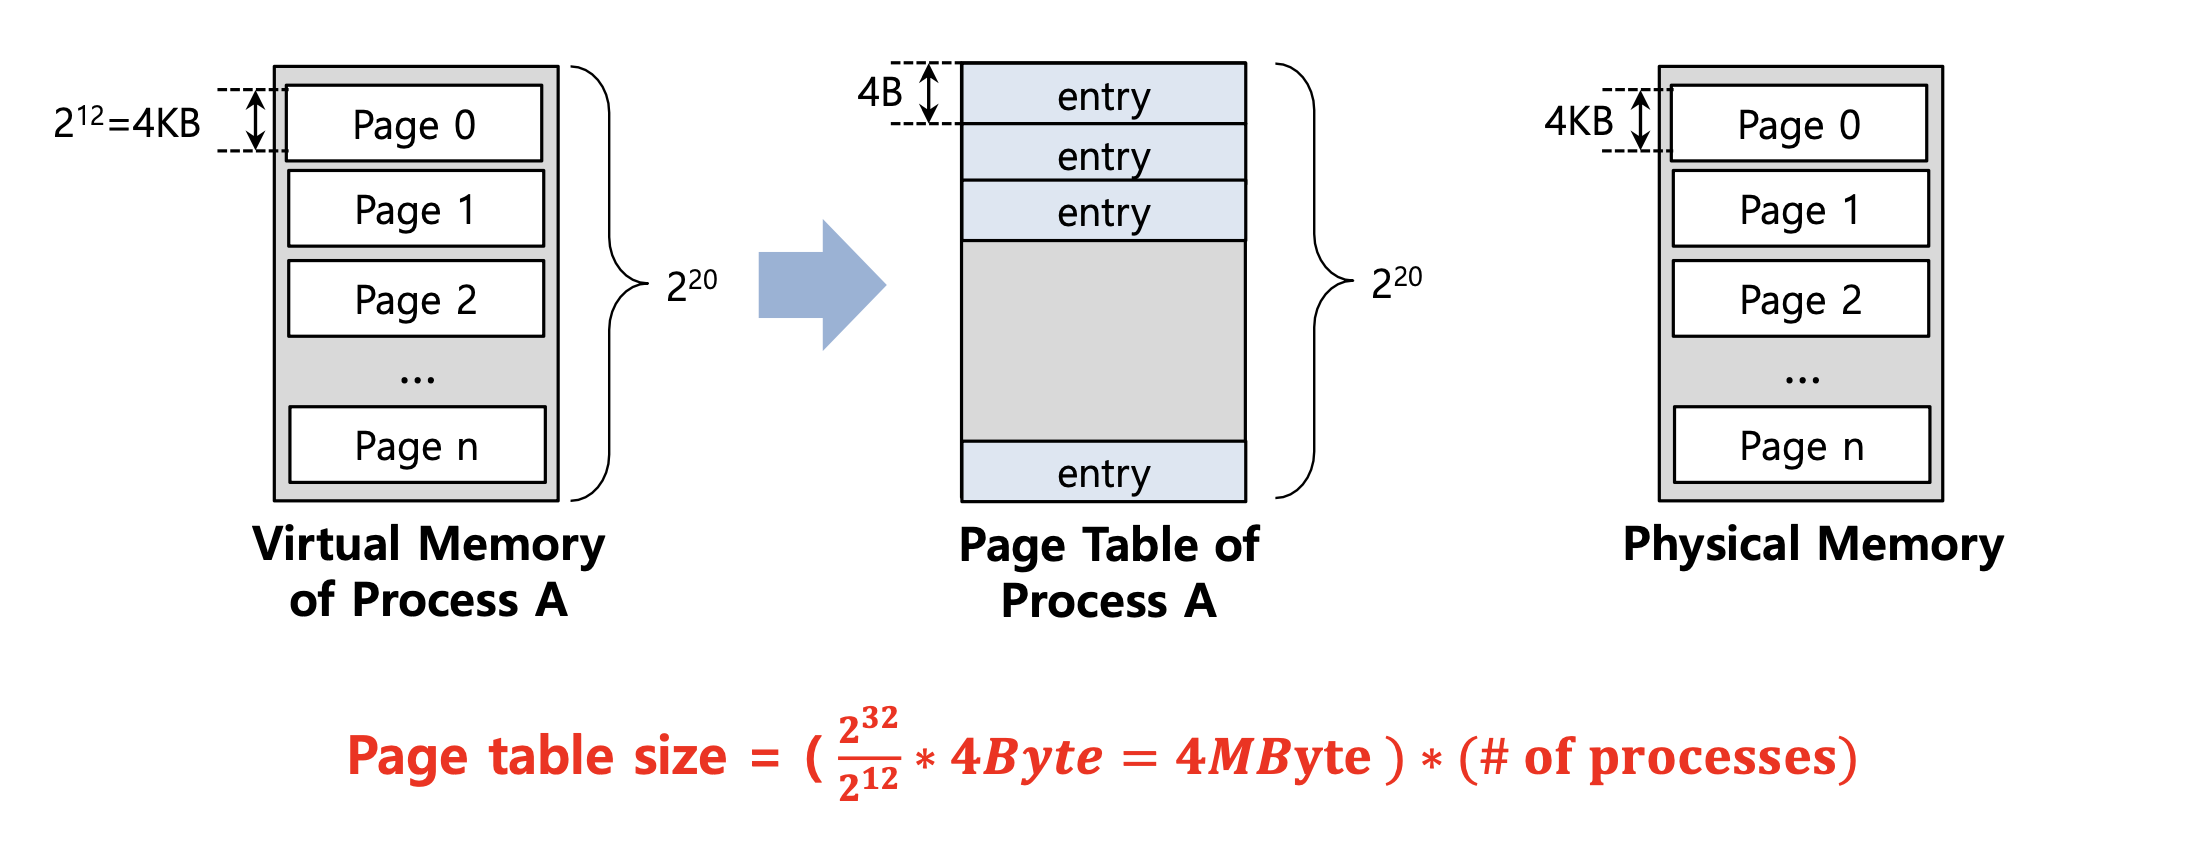
-
여기서
Page table size를 구하는 방법은 (가상 주소 공간의 크기 / page의 크기 ) x page table entry의 크기로 구하면 된다.-
가상 주소 공간의 크기 : 32-bit = 2^32 -
Page의 크기 : 4KB = 2^12 -
Page table entry의 크기 : 4B = 4byte = 2^2
-
-
계산) Page table size = (2^32 / 2^12) x 2^2 = 2^20 x 2^2 = 1MByte x 4Byte = 4MByte (Process 한개당)
-
하나의 Process를 위해 총 4MByte의 page table이 필요하다는 의미이다.
-
결론적으로 Page table 이 너무 커서 너무 많은 메모리를 사용하고 있다.
1. Large Page: Smaller Table
-
Page table이 너무 클 경우를 대비해서 Page table의 크기를 줄여 메모리를 절약하는 방법에 대해 알아보자.
-
Page table의 크기를 줄이는 방법 중 하나는 Page의 크기를 늘려서 Page table size를 줄이는 것이다.
-
예) 16KB 크기의 page 와 4byte 크기를 갖는 page table entry를 가지는 32-bit의 가상 주소(adress space)이 있다.
(이전에는 page 크기는 4KB이고, 현재의 page 크기는 16KB 이다)
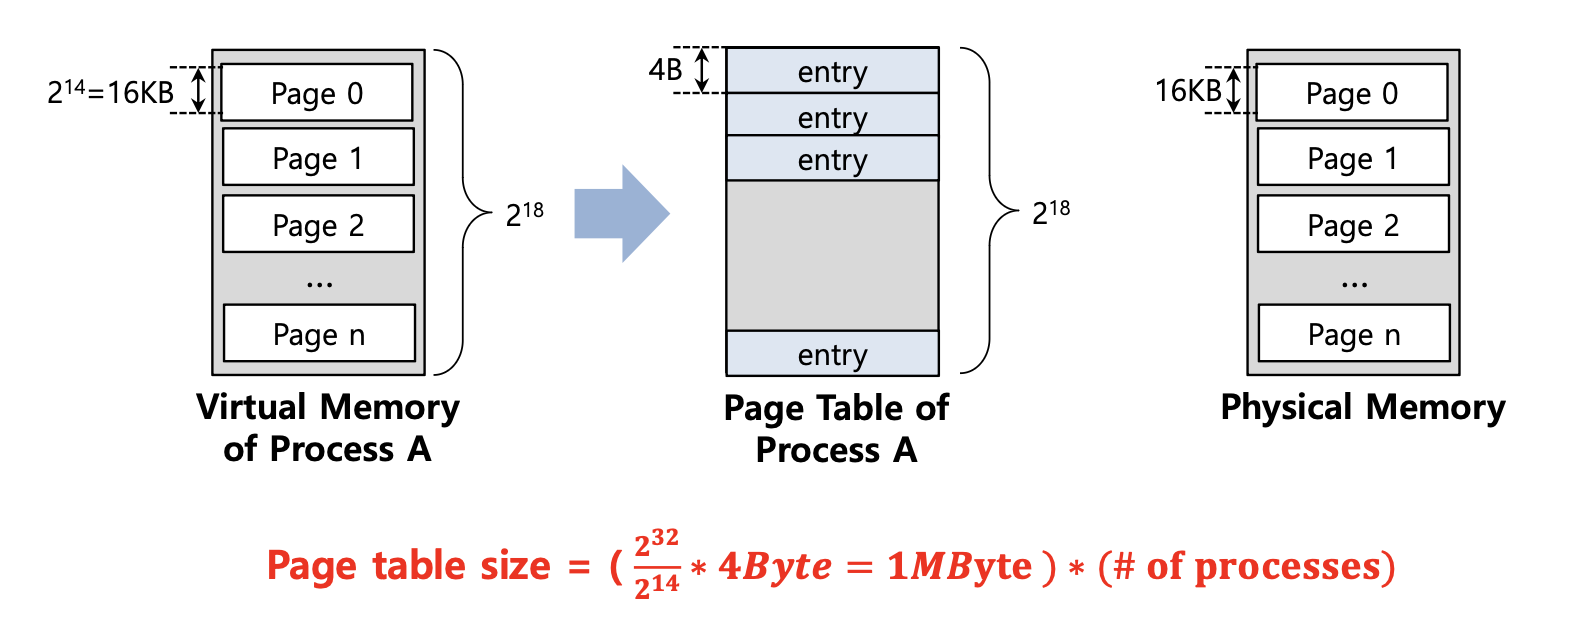
-
위의 예시를 통해
Page table size= 1MByte로 이전 예시보다 Page table 크기가 작아져서 메모리를 절약할 수 있다는 점을 확인할 수 있다. -
하지만, Page 자체가 활용도가 낮아서(under-utilized)(= page 자체 크기가 커서) 내부 단편화가 발생하는 문제점이 있다. (낭비하는 공간이 크다는 점)
내부 단편화란 메모리를 할당할 때 프로세스가 필요한 양보다 더 큰 메모리가 할당되어서 프로세스에서 사용하고 남은 공간을 의미한다. (예) 메모리가 10KB가 할당되었고 프로세스가 필요한 양은 7KB일 때, 남는 공간인 3KB가 낭비된다)
-
더 큰 Page size는 더 적은 page 수를 의미하며 이는 메모리가 빨리 소모된다는 것을 의미한다.
-
결론적으로 Page의 크기를 늘리는 방법은 완전한 해결책은 아니다.
Problem
- 예) 1KB 크기의 Page와 16KB 크기를 갖는 가상 주소 공간이 있다.
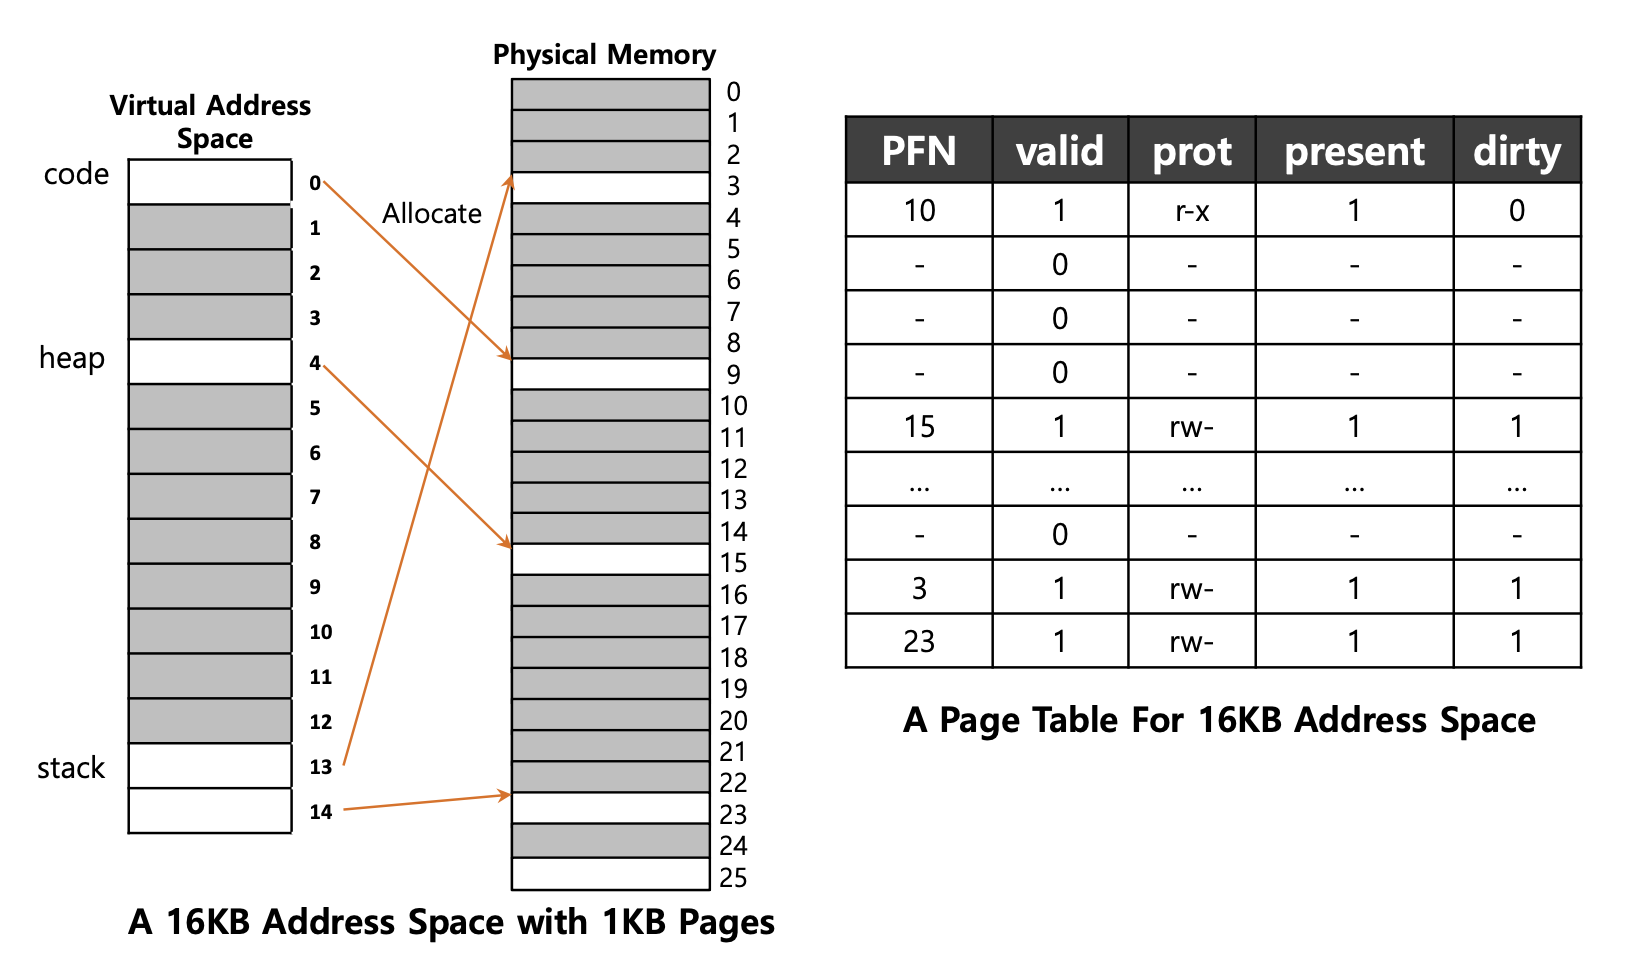
- code 영역에서 1개, heap 영역에서 1개, stack 영역에서 2개로 총 4개의 page table를 사용하는 것을 확인할 수 있다.
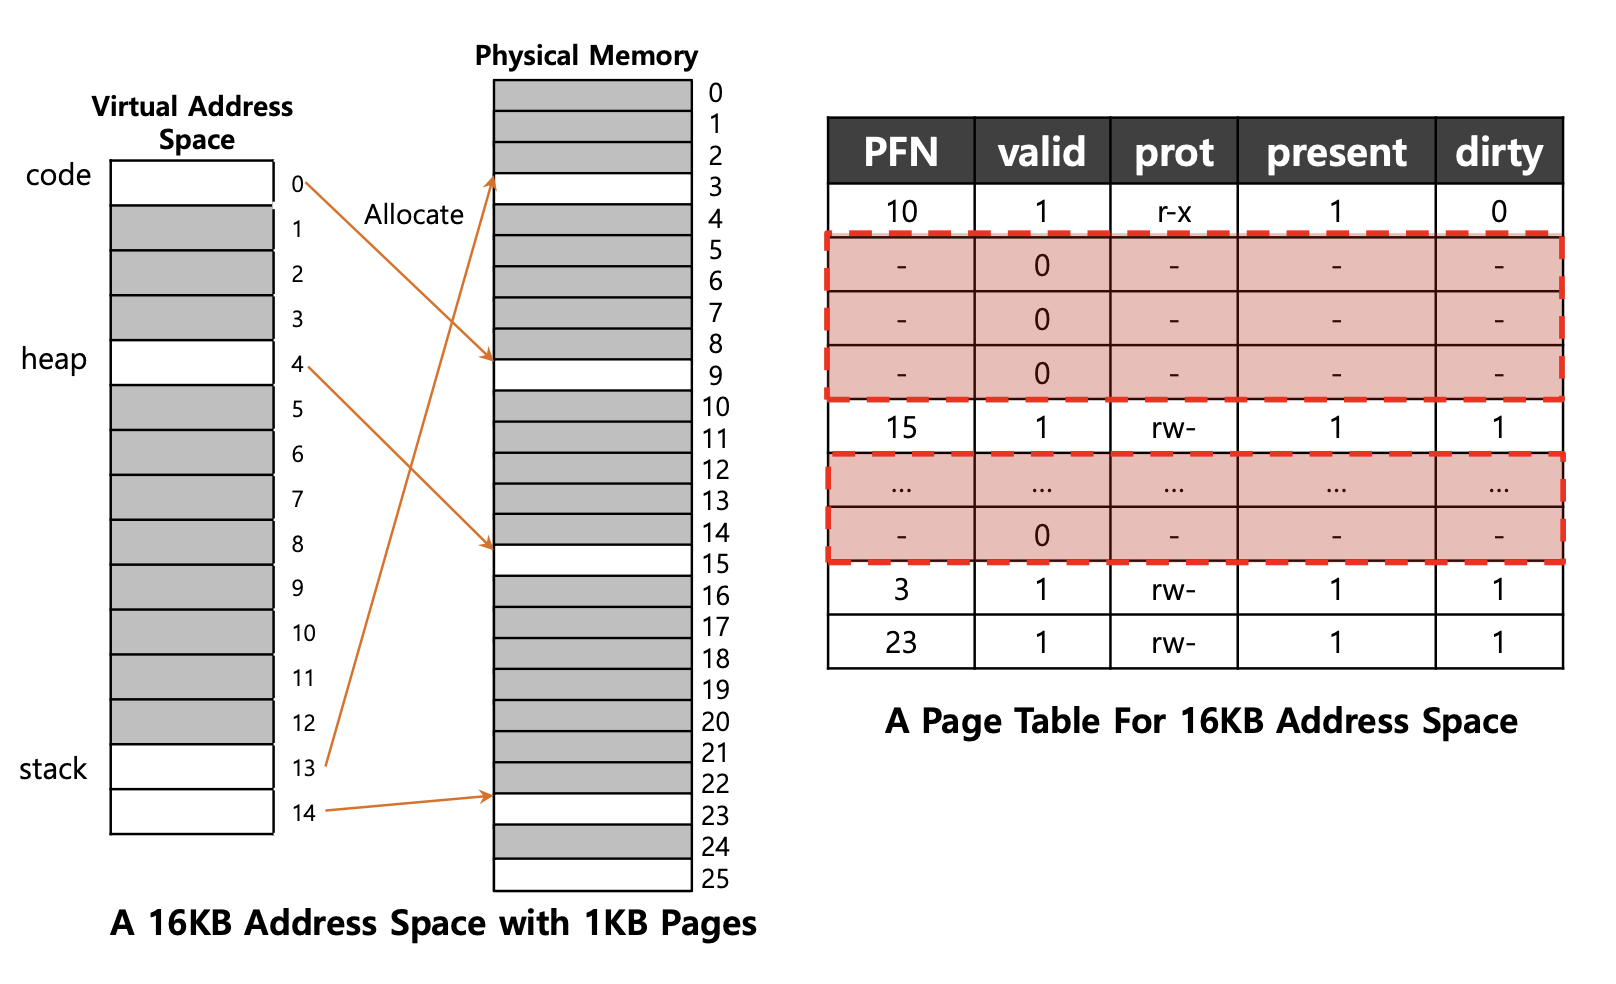
- 위의 예시를 통해 알게 된 점은 4개를 제외한 나머지의 Page table이 안쓰는 것(un-used)을 확인할 수 있다. (어두운 색깔 : 안쓰는 영역)
2. Hybrid Approach: Paging and Segments
-
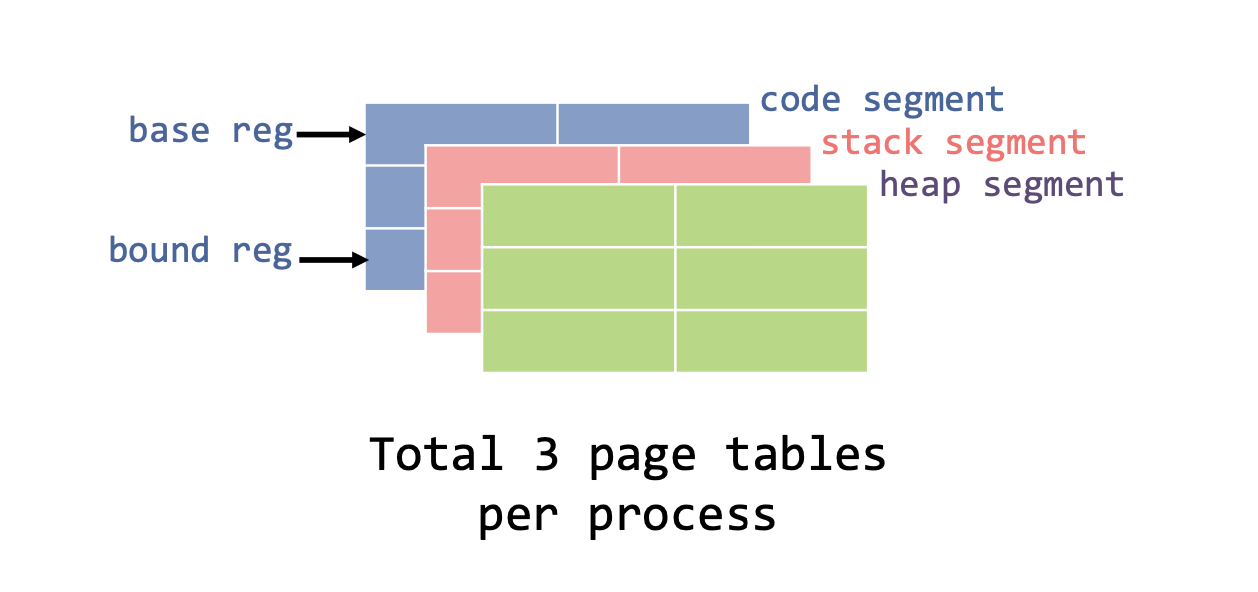
이런 상황에서 Page table의 크기를 줄이는 방법 중 다른 하나는 Paging 기법과 Segmentation 같이 사용하는 것이다.
-
Page table의 메모리 오버헤드를 줄이기 위해서는
base레지스터는 실제주소의 page table를 가리키는데 사용한다.bound레지스터는 해당 page table의 끝을 나타내는데 사용한다.
Simple Example
- 다음 예시를 통해
Paging과 Segments을 같이 사용하는 방법에 대해 알아보자.
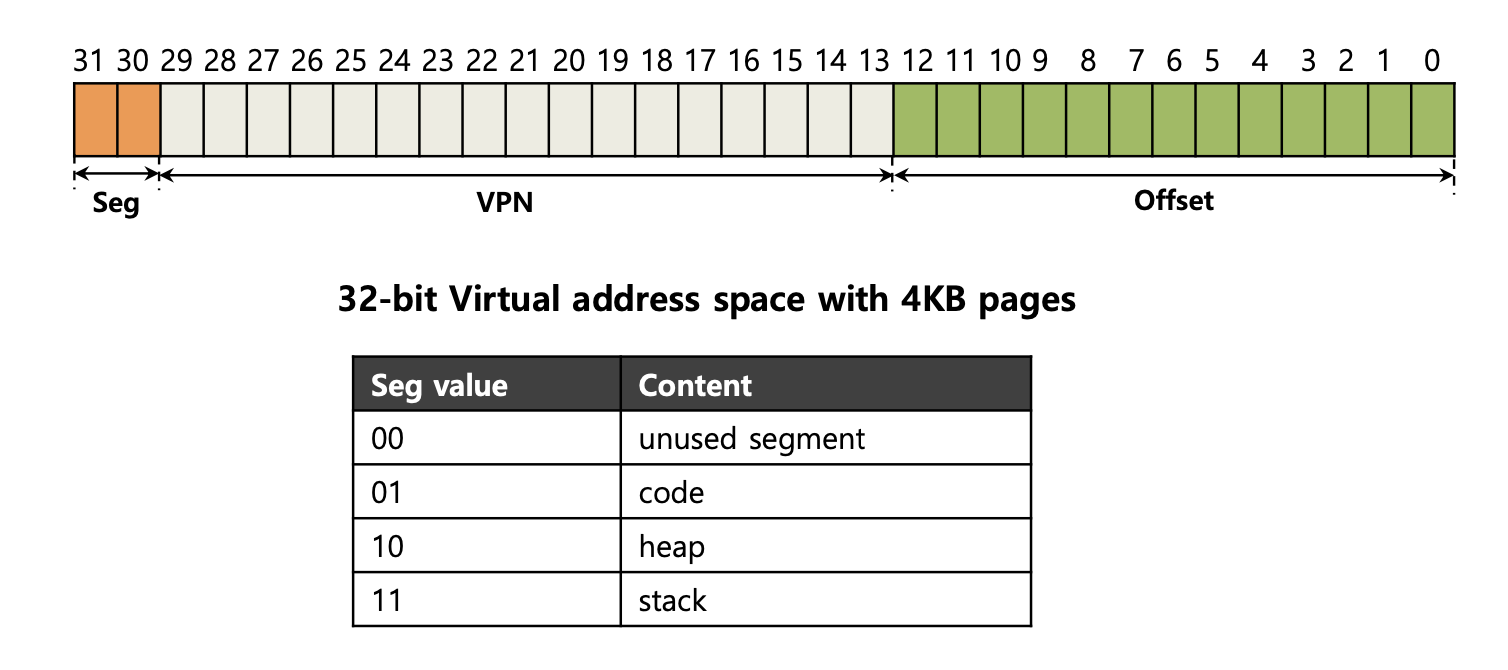
-
예) 각각의 Process는 연관된 3개의 Page table을 가진다고 가정한다.
-
Page의 크기는
4KB, 가상 주소 공간의 크기는32-bit, 4개의 Segment 중3개만 사용한다고 가정한다. -
Process가 실행 중일 때 이러한 각 Segment의
base 레지스터는 해당 Segment에 대한 linear page table의 실제 주소(physical address)가 포함된다.
-
-
- DevHistory 4
- Essay 1
- Java 10
- Spring 15
- SpringBoot 17
- JPA 13
- MySQL 3
- Flyway 1
- Kafka 8
- Technology 22
- GoodCode 7
- Side_Project 20
- Retrospective 4
- AlgorithmSkill 3
- LeetCode 2
- Algorithm 70
- SQL 9
- OS 14
- Database 8
- Network 7
- HTTP 7
- DataStructure 5
- Linux 4
- Woowacourse 4
- Git 9
- AssertJ 1
- IntelliJ 5
- Probability-Statistics 5
- Electronic-Finance 13
- Business-Statistics 13
- Competition 1
- Book 6
- Workout 7
- E.T.C 8